Pages

Friday, November 29, 2013

BOGO SALE and Shutterfly Giveaway WINNER

To show my Thanks to all of my readers, fans and friends, I wanted to participate in the Black Friday Maddness and offer a special discount for the next few days at the bunch's Etsy Shop.


After you've added two items to your shopping cart in the bunch shop, on the checkout screen enter the code THANKFUL2013 and the discount will be applied!  This offer is good until December 4th!

We hope you had a blessed Thanksgiving with friends and family and good food.  My little family decided to do a very non-traditional Thanksgiving together just the 4 of us [Buddy too=)].  We had a yummy breakfast and headed up tot he mountains to find and cut our own Christmas Tree in the Mt. Baker National Forest.  The one we chose was WAY larger once we got it home and in the house, than it seemed in the Wilderness.  But its beautiful.  We snacked on home made Artichoke Spinach Dip, Shrimp and Crab, watched Christmas movies and listened to Christmas music and decorated the house for Christmas!  It was a day we will never forget!  

Here's my little turkey and handsome husband:


It was such a beautiful drive:


The Christmas Tree we chose in it's natural habitat:


Our first hint, it might have been a LITTLE LARGE:


All lit up:


For those of you anxiously awaiting the announcement of the winner of the Shutterfly Challenge Giveaway- CONGRATULATIONS to Jessica Warfield!


Enjoy this start to the Holiday Season!  Many thanks, again to my loyal fans, readers and friends!


Wednesday, November 27, 2013

Quick, Cheap and Easy Thanksgiving Tablescape Ideas {Our Friendsgiving}

We've recently moved to a different city- one I lived in about 5 years ago and it holds my HEART.  We are SOOO happy to be back here and loving our more laid back life style.  For our housewarming party it was perfecting timing to host it as a Friendsgiving. {Not familiar with the term "Friendsgiving"???  Its basically Thanksgiving, but with friends and each person brings a dish- the host only does the Turkey.}

I was so excited to reconnect with all my friends in this City and host them in our new home, but was worried I wouldn't have time to make the gathering as beautiful as I wanted to.  Thankfully, the day before two friends came up from Seattle to help us celebrate and I had extra help to put together a pretty environment for our guests.
This is Ashley [I've written about her before here]


We had four different tables to sit at to accommodate everyone coming- it is important to me that everyone have a space to sit and enjoy their meal and the company.  This ended up being helpful when I didn't have 20 of the same type of table settings.  I was able to set and decorate each table a little differently and tied them all together with a few special items:

I'm Thankful For.... Kraft Paper Place-mats


Because I didn't have enough of one type of place setting to make each on the same, the placemats Ashley and I created helped to tie everything together.  I purchased a roll of Kraft Paper at Fred Meyer and used my rotary cutter and cutting mat to cut 20 rectangles the size of place mats.  Because the paper came on a roll, it REALLY, really wanted to roll back up- so we placed some heavy tool boxes from the garage on them over night to flatten them out, worked great!  
Once they were flat, Ashley used my acrylic stamp pad and my letter stamps to create a "I'm Thankful For" stamp and stamped each place setting.  We also included a nice pen so that our guests could jot down a few things they were thankful for, if they wanted.  Most did, and I enjoyed reading what they wrote as I cleaned up!

I also used wood rounds as part of the centerpieces left from our wedding to tie most of the tables together-


The four tablescapes


Vintage Rustic


An unaltered vintage wooden table with a white linen table runner, Autumn China, Beaded Leaf Centerpiece and Candlestick.

Breakfast Bar Leaf Plates


A cozy spot for two- I got to use my beautiful leaf plates at the breakfast bar setting, with a gold charger, cloth napkins and Mason Jar Mugs.

Felt Leaves and Candles


Beautiful felt leaves, Autumn China, my vintage candle stick holder, White-Trash Wine Glasses with tea light candles and some ANTLERS!!


Linen Forest


This table is three card tables with ONE LONG linen table cloth (that I quickly finished the edges of off of an interior decor fabric bolt).  Wood rounds, two rustic urns with moss and pumpkins, and a rustic green glass vase with some grape vine pumpkins and my square modern plates finish off this woodsy table.


The ONLY item I purchased to make these tablescapes for our Friendsgiving was the Kraft Paper, and it was $3.99 for the whole roll.  I encourage you to get creative with the items you have around your home, and outside your home to create some unique, and unforgettable tablescapes for your Thanksgiving Celebrations tomorrow.

I am so thankful for all of my friends that read my blog, THANK YOU-  and Happy Thanksgiving!


Thursday, November 21, 2013

$100 Shutterfly Giveaway Pt. 3

I hope you enjoyed our Pt. 1 and Pt. 2 of our Shutterfly Photo Gift Series... 
To see more great gift ideas from Shutterfly, including altered handmade gifts, take a look at the special Looksi Square – The Practical Photogift collection featuring Shutterfly holiday gift ideas on Friday, November 22, 2013.

SHUTTERFLY $100 CREDIT GIVEAWAY

In the meantime, as part of the Looksi and Shutterfly collaboration, Shutterfly is offering all of you the chance to win $100 credit! Think of the photo gifts or Christmas cards you could order!
Shutterflt

Shutterfly Giveaways

Rafflecopter will walk you through the entry process! You’ll notice that one of the ways to enter is by submitting your own posts about projects you’ve done with photos to LooksiSquare.com; we’d love to see what you’ve done with pictures too! Good luck!


a Rafflecopter giveaway


Wednesday, November 20, 2013

{Madi's "Mi" Bag} Shutterfly Practical Gift Pt. 2

*This post is part of a sponsored collaboration between Shutterfly and LooksiSquare. I received product compensation, but all opinions are {honestly} my own!*


Pt. 2

An issue I've never wanted to deal with for the little Miss Madisyn, is the loss of her beloved "Mi" [her very, very special blanky].  As a baby and child, I also had a very special blanky that I needed to go to sleep.  I don't recall getting to take it everywhere with me, but it did ALWAYS go on overnights.  There were a few times that it got left behind, and consequently some lonely nights without it until it was able to be returned.  

As a Mommy, I have always wanted to prevent this issue from EVER happening to my baby.  The solution I came up with, was making sure that whenever "Mi" leaves the house [only when we won't be sleeping or napping at home] it has to be in a specific bag, and that specific bag [with "Mi" inside] also has to return home with us.  It would be like forgetting my purse [which does happen from time to time, but hopefully less likely than just the blanky on its own].  We've always used a plain old boring reusable shipping bag, nothing special.  When I saw that Shutterfly offers a wonderful Reusable Shopping Bag, and IT CAN BE PERSONALIZED with a PHOTO AND TEXT, I knew it was EXACTLY what we needed!  

Madisyn enjoys the excitement of opening a gift, often as much as she enjoys what is inside.  It is so fun watching her open, I thought I needed to share that with you as well *insert smiling face here*.


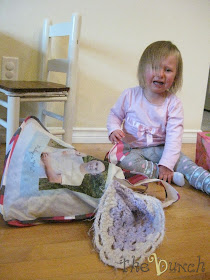
You can see she enjoyed what she found inside the pretty wrapping as well:  Who wouldn't enjoy seeing a picture of their beautiful family, stuck onto a pretty bag?!


The 3 best things about this new, special "Mi Bag" are:
  1. It feels super good while wearing it and seems very durable!
  2. IT IS LARGE- not only is there room for "Mi", there is extra space, because you know it's never JUST "Mi" that has to go, an entourage of "friends" [stuffed animals] also have to come along.
  3. and its PRETTY!  I chose the Mutil Chevron Stripes design option, but there were so many to choose from!

The possibilities are endless for uses of these Reusable Shopping Bags because there are so many style, and personalization options!  I would love to hear if you order some, and what creative uses you came up with for them!


Thank you for following along in our Shutterfly Practical Gift series.  I felt that the two wonderful photo gifts we were blessed with needed to be honored with their own separate stories!  

Don't forget to stop by tomorrow to be entered into a chance to win $100 from LooksiSquare and Shutterfly!


"Mi" Bag Bloopers:  I couldn't NOT share the outtakes from our photo shoot- Madi is TWO- and almost everything we do gets accompanied by a really big tantrum these days.  While Madisyn was VERY excited to get to open a Birthday Gift, and LOVED the bag she received and the pretty picture of her family on it- at the time, she was NOT EXCITED to put her "Mi" in it= so funny, I had to share:


Tuesday, November 19, 2013

{vintage Cowgirl Thank You}- Shutterfly Practical Gift Pt. 1

*This post is part of a sponsored collaboration between Shutterfly and LooksiSquare. I received product compensation, but all opinions are {honestly} my own!*

All of you know one of my favorite little things to write about it the little Miss Madisyn.  And well, she turned {2} in September.  I had a big, beautiful COWGIRL Birthday Party planned for her, and LIFE HAPPENED>  and we had to cancel it.  I was BEYOND SAD to not be able to throw her this 2nd Birthday Rodeo- but we did have a very nice intimate party with our little family and my parents for her.  It was a special time with great memories and that is what is important.  [However, I do plan on throwing her a 2.5 Party for all her friends in March, because I can't stomach not getting to put together the party I planned every little detail for].  


Shutterfly and Looksi Square provided an opportunity for me to incorporate some of Shutterfly's awesome photo-gifts as a part of Madisyn's Birthday- and even though I wasn't able to use them for her BIG PARTY, they are so versatile I was able to figure out a great use for them [even after they had been ordered and the party cancelled].  I am excited to tell you about both the way I had PLANNED to use them and how they actually were used.

Pt. 1

The first photo-gift I got to play with was their Gift Tags.  So cute, and so many adorable choices, but they had one tag PERFECT for her Rodeo...
Cowboy Hero Gift Tag, they call it.  I had intended to make the CUTEST Stick Horse toys for all of Madisyn's little guests {and I still will, so I'm not going to divulge all the details of that project, you have to wait until March *wink*}.  There will be a Rodeo Corral (just like this) where each little Cowboy/Cowgirl will find a special set of Party Favors:  A Hat, Bandanna, Sheriff Badge and there own Ride-able Horse.  These Cowboy Hero Gift Tags I had intended on using to identify which party favor set was for which guest.  And it the Gift Tags allowed for Madisyn to get to make each of her guests feel welcome, wanted and say THANK YOU all in one place.

How I ended up actually using the tag, was JUST AS SPECIAL-


For our friends and family that ended up sending Madi a gift, or a card, we needed a special way to thank them, since we didn't get to celebrate WITH them.  We had photos taken with the lovely Miss Lindsay of Lindsay Porter Photography the week before Madisyn's Birthday so that we could use the photos at her party.  These prints ended up becoming the main feature inside the Thank You's.

Follow my photos below to see how some Vintage Book Pages, a stamp, photo prints, ribbon and the Shutterfly Gift Tags came together to be mailed off as special Thank You's.


After folding it all down, I used a rubber stamp to stamp some THANK YOU's  [This could be done with any message, for any occasion].


After the paper was all folded around the photos, and stamped with the message, I wrote out the Gift Tag for the recipient.  


A rectangular whole punch on each side of the Tag, and some ribbon through the holes held it all together.


Cute, Right?!  Well, wait till you see my Pt. 2 with the OTHER Photo Gift Madisyn got to enjoy for her birthday!

ALSO< Shuterfly and Looksi Square have put together an opportunity for you to win $100!!! More info in tomorrow's Pt. 2 post.

To see more great gift ideas from Shutterfly, take a look at the special  Looksi Square - Shutterfly holiday gift collection on Friday, November 22.


Ya'll come back now, Ya'hear!

I've shared my project at these lovely linky parties:


Thursday, November 14, 2013

{Burlap "Joy" Banner} A little bit of Embellishment goes a LONG way & GIVEAWAY!


My favorite photographer, Lindsay Porter from Lindsay Porter Photography asked me to create a banner for her upcoming Holiday Mini Session.  She wanted something simple and rustic to compliment the venue for her sessions, a Christmas Tree Farm.

I decided on Burlap and Lindsay wanted it to say "JOY".  I always sew my letters on my banners, unlike most that I see around that are painted.  [You can even follow along the tutorial I created to make your own here if you'd like to make your own!]  I feel like it gives a more professional, finished look.  After sewing the pennants and the letters, it was too plain.  I wanted the banner to be rustic, but not drab.... so I decided it needed a little EMBELLISHMENT!


I have experimented with all different types of fabric flower making from all the wonderful tutorials on pinterest.  But there was one style I hadn't tried yet... the rolled fabric flowers.  I did a quick search for a good tutorial and came across this one from jones design company.

I quickly created two cute little flowers.  Then, I used some heavy fusible interfacing to stiffen up some fabric to make some leaves and hot glued it all onto the J and Y of my banner and WHHHAAALLAAA!  See how much difference a little EMBELLISHMENT makes?!


What projects are you working on this Autumn and Winter that could benefit from a little bit of Embellishment?!  We'd love to hear about them- please leave a comment telling us about them to be entered into the giveaway for a chance to win one of these banners for yourself or to give to a friend!! And please share, share, share this post for MORE CHANCES TO WIN!


a Rafflecopter giveaway


Wednesday, November 6, 2013

Baby Shower {Greeting Card Scrap Book} Kit

What do you do with all the beautiful greeting cards you receive for your child's first birthday, or in the mail for Christmas, or on your Wedding Day???  Well, I am the type of person that has a hard time throwing them away, but they just end up sitting in a keepsake box tucked away on a shelf.

THE SOLUTION

I've come across  a concept  over the past few years on blogs, Pinterest, etc and I think it is fabulous.
But, I think there is a way to take this concept up a notch and not only include those beautiful greeting cards in the scrapbook, but use them as backdrop for photos from the event, journals, keepsakes and more! [Click the photo to be taken to one lovely blog post with the idea]


SOOOOO....I've been saving the cards we receive for different milestones and holidays to create this style of scrap book ever since, but have not taken the time to put one together yet.  Here's the bin I've been saving all of Madisyn's Baby Shower Cards in....


As you can read here, I needed a gift for a Gender Neutral Baby Shower and wanted it to be something useful, unique and memorable.  I figured it was the perfect time to make myself put together one of these scrapbooks for someone else, so that I would know exactly how I want to do mine that I've been saving all my cards for.

So, I went through Madisyn's books and found that we happened to have two copies of the Pokey Little Puppy.  This is the perfect, classic, and gender neutral book to create this kit with!

I started by using a box cutter and carefully cut off the front and back cover of the book right along the spine.


And ended up with a front and a back for the scrapbook.


I gathered some gender neutral colored supplies (ribbon, cardstock, patterned paper, etc) and some binder rings and started to put it all together.


Using my book binding punch, I made 3 holes in the covers for the binder rings.


Then, I Mod Podged some patterned paper on the inside of the covers for a spot to include the Invitation to the party on the inside of the cover and a Guest List in the back.  


I also included a few blank patterned pages inside in case she needs extra room to journal or anything.  To complete the kit, I gathered photo corners, some extra coordinating card-stock pieces, a sharpie to write down the gifts and guests at the party, and a hole puncher.


Then, I created a little celo bag to put it all together in and made a cute little tag for the top!  To make the tag, I just measured a half an inch on either side larger than the envelope and folded a piece of paper, then stapled it onto the top of the bag and glued my letters over the staples.


And here it is all together (with the Mod Podge not yet dry behind the letters).


In her gift basket I also wanted to include the What to Expect- The First Year book that I used as a reference with Madisyn.  I enjoyed this book, and thought it might be special for her to thumb through the same one I used (and there's no sense in buying another book, when I already had it and don't need it anymore!)


It turned out great, and I can't wait to see it after she puts it all together.  Now, I just need to pull out another duplicate book and get Madisyn's made! [I will certainly do a follow up post so you can see how the greeting cards are used to mount photos, keepsakes and more!]

I did create a Silhouette cut file for this project that I'd be happy to email to you for the wording on the tag- just leave me a note!

I'd love to hear about the Greeting Card Scrap Books you make with this concept- the possibilities are endless!  Your comments make my day!


Linked up at: