Showing posts with label DIY Decor. Show all posts

Tuesday, December 3, 2013

Feast on the Farm {Holiday Wreath Giveaway}


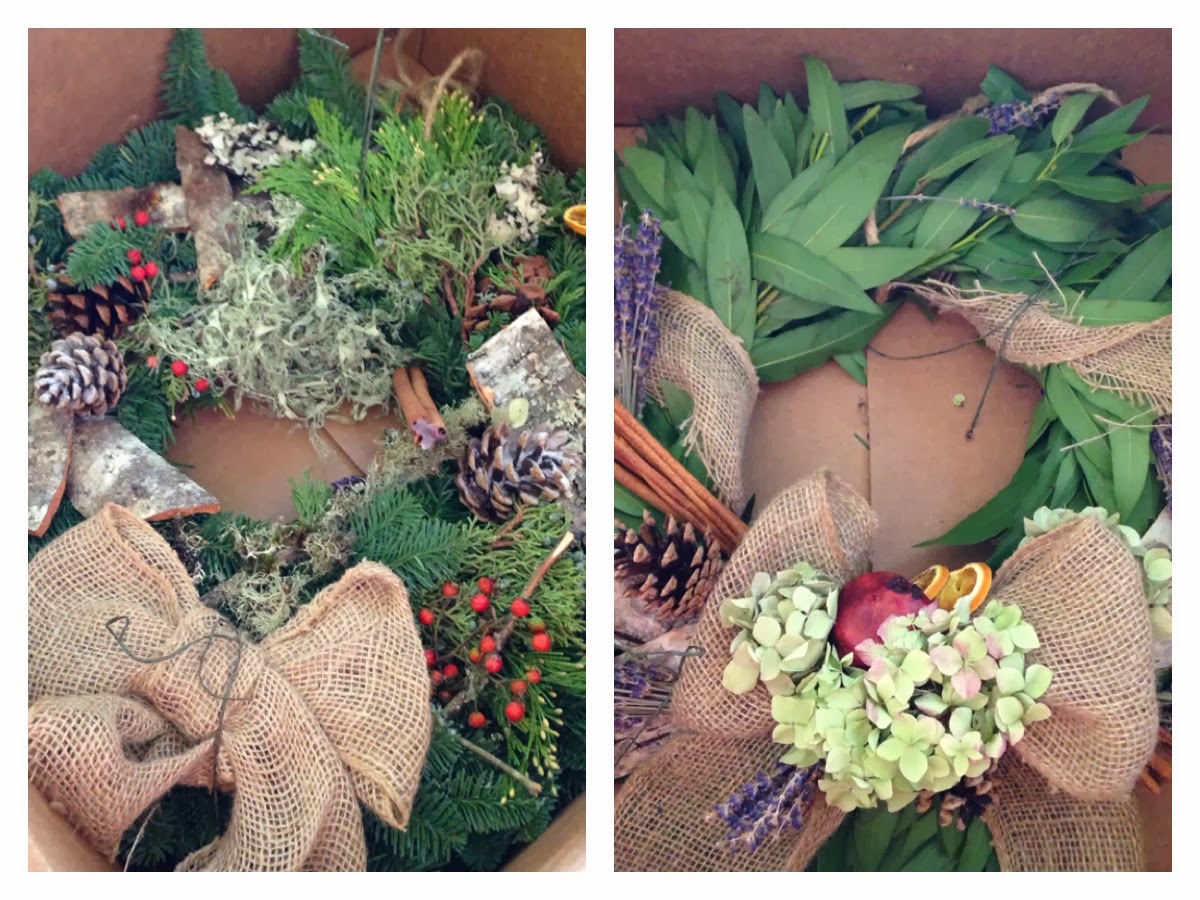
We received a very lovely package at the bunch today...

TWO Holiday Wreaths from my sister's company Lola Event Floral & Design--- and one is for a GIVEAWAY {the other is for my family to enjoy =)- thanks sis}!!!   
So, lets get this started-

THE PRIZE: 

"Feast on the Farm" Wreath:  A celebration of what makes our family lavender and herb farm great (and smell great, too). Dried lavender from the fields, bark from the surrounding woods, cinnamon, and dried flowers and fruit on a fresh bay leaf wreath.  This wreath is about 18 inches in diameter, so if you pull a leaf or two for your holiday feast, it won't be missed


HOW TO ENTER:

1. Like the bunch on Facebook and leave a comment that you do.
2. Like Lola Event Floral & Design on Facebook and leave a comment that you do.
3. Click over to Lola Floral and check out the rest of the Holiday Wreaths they offer, and consider having one sent to a loved one to spread some cheer- Leave a comment that you did- and tell us which one is your favorite.  
4. Share this Giveaway opportunity with your friends and leave a comment that you did.

When I see that you've done each of these and left me a comment telling me you've done so, I will enter you into the Giveaway!

This Giveaway will end at Midnight on 12/9 and the winner will be announced on the blog, so make sure you follow us by email, so you don't miss the opportunity if you win!  Eligible to those in the Continental USA only.  
Good luck and Thank you for entering.  AND Thank You to Lola Floral for the beautiful wreaths!


Wednesday, November 27, 2013

Quick, Cheap and Easy Thanksgiving Tablescape Ideas {Our Friendsgiving}

We've recently moved to a different city- one I lived in about 5 years ago and it holds my HEART.  We are SOOO happy to be back here and loving our more laid back life style.  For our housewarming party it was perfecting timing to host it as a Friendsgiving. {Not familiar with the term "Friendsgiving"???  Its basically Thanksgiving, but with friends and each person brings a dish- the host only does the Turkey.}

I was so excited to reconnect with all my friends in this City and host them in our new home, but was worried I wouldn't have time to make the gathering as beautiful as I wanted to.  Thankfully, the day before two friends came up from Seattle to help us celebrate and I had extra help to put together a pretty environment for our guests.
This is Ashley [I've written about her before here]


We had four different tables to sit at to accommodate everyone coming- it is important to me that everyone have a space to sit and enjoy their meal and the company.  This ended up being helpful when I didn't have 20 of the same type of table settings.  I was able to set and decorate each table a little differently and tied them all together with a few special items:

I'm Thankful For.... Kraft Paper Place-mats


Because I didn't have enough of one type of place setting to make each on the same, the placemats Ashley and I created helped to tie everything together.  I purchased a roll of Kraft Paper at Fred Meyer and used my rotary cutter and cutting mat to cut 20 rectangles the size of place mats.  Because the paper came on a roll, it REALLY, really wanted to roll back up- so we placed some heavy tool boxes from the garage on them over night to flatten them out, worked great!  
Once they were flat, Ashley used my acrylic stamp pad and my letter stamps to create a "I'm Thankful For" stamp and stamped each place setting.  We also included a nice pen so that our guests could jot down a few things they were thankful for, if they wanted.  Most did, and I enjoyed reading what they wrote as I cleaned up!

I also used wood rounds as part of the centerpieces left from our wedding to tie most of the tables together-


The four tablescapes


Vintage Rustic


An unaltered vintage wooden table with a white linen table runner, Autumn China, Beaded Leaf Centerpiece and Candlestick.

Breakfast Bar Leaf Plates


A cozy spot for two- I got to use my beautiful leaf plates at the breakfast bar setting, with a gold charger, cloth napkins and Mason Jar Mugs.

Felt Leaves and Candles


Beautiful felt leaves, Autumn China, my vintage candle stick holder, White-Trash Wine Glasses with tea light candles and some ANTLERS!!


Linen Forest


This table is three card tables with ONE LONG linen table cloth (that I quickly finished the edges of off of an interior decor fabric bolt).  Wood rounds, two rustic urns with moss and pumpkins, and a rustic green glass vase with some grape vine pumpkins and my square modern plates finish off this woodsy table.


The ONLY item I purchased to make these tablescapes for our Friendsgiving was the Kraft Paper, and it was $3.99 for the whole roll.  I encourage you to get creative with the items you have around your home, and outside your home to create some unique, and unforgettable tablescapes for your Thanksgiving Celebrations tomorrow.

I am so thankful for all of my friends that read my blog, THANK YOU-  and Happy Thanksgiving!


Thursday, November 14, 2013

{Burlap "Joy" Banner} A little bit of Embellishment goes a LONG way & GIVEAWAY!


My favorite photographer, Lindsay Porter from Lindsay Porter Photography asked me to create a banner for her upcoming Holiday Mini Session.  She wanted something simple and rustic to compliment the venue for her sessions, a Christmas Tree Farm.

I decided on Burlap and Lindsay wanted it to say "JOY".  I always sew my letters on my banners, unlike most that I see around that are painted.  [You can even follow along the tutorial I created to make your own here if you'd like to make your own!]  I feel like it gives a more professional, finished look.  After sewing the pennants and the letters, it was too plain.  I wanted the banner to be rustic, but not drab.... so I decided it needed a little EMBELLISHMENT!


I have experimented with all different types of fabric flower making from all the wonderful tutorials on pinterest.  But there was one style I hadn't tried yet... the rolled fabric flowers.  I did a quick search for a good tutorial and came across this one from jones design company.

I quickly created two cute little flowers.  Then, I used some heavy fusible interfacing to stiffen up some fabric to make some leaves and hot glued it all onto the J and Y of my banner and WHHHAAALLAAA!  See how much difference a little EMBELLISHMENT makes?!


What projects are you working on this Autumn and Winter that could benefit from a little bit of Embellishment?!  We'd love to hear about them- please leave a comment telling us about them to be entered into the giveaway for a chance to win one of these banners for yourself or to give to a friend!! And please share, share, share this post for MORE CHANCES TO WIN!


a Rafflecopter giveaway


Friday, November 1, 2013

Gender Neutral DIY Baby Shower Gift Ideas

I am headed to one of my best friend's baby shower this weekend, and I am super excited to see all the ladies and babies!  However, this strong friend of mine has held out in finding out what the gender is of her FIRST BABY at the request of her husband!  This is fun and exciting and all, but it makes gift giving difficult.  Especially when I want to hand-craft gifts special, just for this little sweetie.
Aimee has special requested one of my {Monthly Onesie Sets} as her baby shower gift, but I don't want them to be gender neutral, so those will have to wait.  BUT, I can't show up EMPTY HANDED, right?!
So, I went on a Pinterest Hunt to come up with some cute, and easy gifts for options to take to the shower.

I hope you enjoy my collection of DIY Gender Neutral Baby Shower Gifts below! [Click the image to follow a link to the tutorial]

Burp Cloths


Do Not Disturb Sign


Diaper Caddy/Organizing Bin


UpCycled T-Shirt Bibs


Soft Blocks


Closet Dividers


Alphabet Art


Nursing Cover


Taggie Blanket


Baby Blocks


And of course, what I've schemed up to make, I cannot find a tutorial for--- so I guess I will have to make my own for you all!

It's along the same ideas as this:

Christmas Card Book


I better get started!  Stay tuned to see what I've come up with!


Friday, October 18, 2013

{Autumn Paper Crafts} a curated collection for looksi square

Hi Friends!

I curated a collection of Autumn Paper Crafts for looksi square this week and thought I would share them with you!  I found some really fun projects.  Take a look at the photo sneak peak below- and please click on over to looksi square to find the actual tutorials and blog posts!  Have a great weekend!


Monday, October 14, 2013

Halloween Decor {Boo REVAMPED}

I love saving stuff from the dump- especially something that has sentimental value.  But, ONLY if I can put it to good use!

My mom was SOOO good at making each and every holiday special for us kids in some way (which I've written about before), and I love thinking back on my childhood and remembering those things she did (mostly VERY cheap, or even free things) to make each little holiday special, in some way.

Most of the time those special feelings were created with the use of crafty decor.  I'm not sure where she came up with this Halloween Sign- but it isn't half bad, really.  And I couldn't stand to let it get tossed into the "dump" pile as we were cleaning out the garage last week.


I remembered that I purchased a BLACK feather wreath on 75% off clearance at Joann's last winder and then knew exactly what I would do with them!  


I cut it all apart and ended up with these three "BOO" letters that were in desperate need of painting.


After some "Vintage White" spray paint (about 6 coats to cover up the splatter paint), they were beautiful.


I used some black sturdy ribbon, strategically hot glued to the rear of each letter to tie them on the wreath individually.  I paid close attention to what direction I wanted my letters hanging out to figure out which direction to glue on the ribbon.

My mom, is MASTER of bows--- she can make them big and beautiful or small and beautiful- unfortunately a skill I have yet to learn from her, but I love to watch each time- hoping I will learn.
She made me a beautiful bow with some vintage style black and white striped ribbon to adorn on the wreath.


It turned out simple and beautiful, exactly what I wanted.


A little something to add to my so-far small collection of Halloween decor to assist in making Madisyn's holiday a little more special.

Did you make a wreath this year for Halloween?  I'd love to see and hear about it- please leave links in comments!


Linked Up At:
Wow me Wednesday at Ginger Snap Crafts
Wonderful Wednesday at Ducks in a Row
Show and Share Wednesday at Mostly Homemade Mom


Blogging tips