Showing posts with label Holiday Decor. Show all posts

Tuesday, December 3, 2013

Feast on the Farm {Holiday Wreath Giveaway}


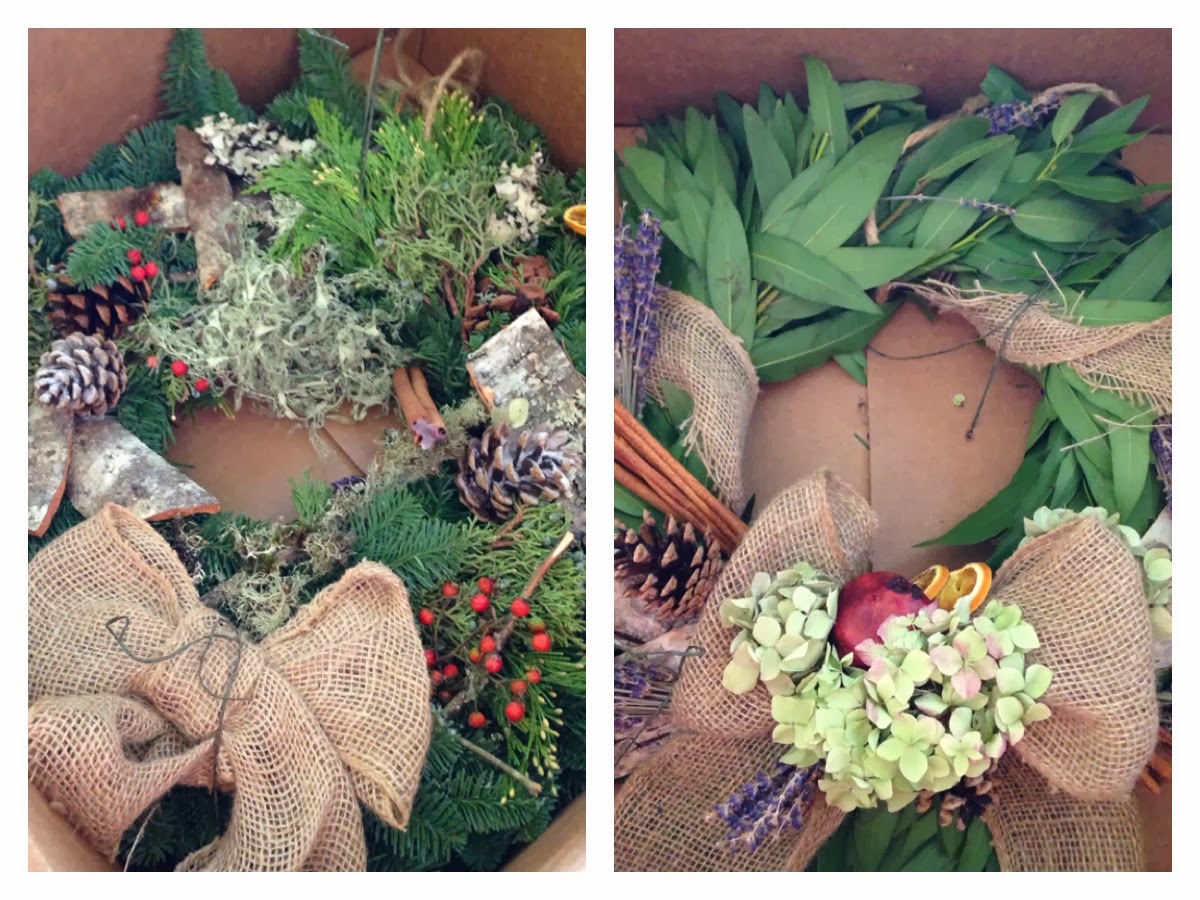
We received a very lovely package at the bunch today...

TWO Holiday Wreaths from my sister's company Lola Event Floral & Design--- and one is for a GIVEAWAY {the other is for my family to enjoy =)- thanks sis}!!!   
So, lets get this started-

THE PRIZE: 

"Feast on the Farm" Wreath:  A celebration of what makes our family lavender and herb farm great (and smell great, too). Dried lavender from the fields, bark from the surrounding woods, cinnamon, and dried flowers and fruit on a fresh bay leaf wreath.  This wreath is about 18 inches in diameter, so if you pull a leaf or two for your holiday feast, it won't be missed


HOW TO ENTER:

1. Like the bunch on Facebook and leave a comment that you do.
2. Like Lola Event Floral & Design on Facebook and leave a comment that you do.
3. Click over to Lola Floral and check out the rest of the Holiday Wreaths they offer, and consider having one sent to a loved one to spread some cheer- Leave a comment that you did- and tell us which one is your favorite.  
4. Share this Giveaway opportunity with your friends and leave a comment that you did.

When I see that you've done each of these and left me a comment telling me you've done so, I will enter you into the Giveaway!

This Giveaway will end at Midnight on 12/9 and the winner will be announced on the blog, so make sure you follow us by email, so you don't miss the opportunity if you win!  Eligible to those in the Continental USA only.  
Good luck and Thank you for entering.  AND Thank You to Lola Floral for the beautiful wreaths!


Friday, November 29, 2013

BOGO SALE and Shutterfly Giveaway WINNER

To show my Thanks to all of my readers, fans and friends, I wanted to participate in the Black Friday Maddness and offer a special discount for the next few days at the bunch's Etsy Shop.


After you've added two items to your shopping cart in the bunch shop, on the checkout screen enter the code THANKFUL2013 and the discount will be applied!  This offer is good until December 4th!

We hope you had a blessed Thanksgiving with friends and family and good food.  My little family decided to do a very non-traditional Thanksgiving together just the 4 of us [Buddy too=)].  We had a yummy breakfast and headed up tot he mountains to find and cut our own Christmas Tree in the Mt. Baker National Forest.  The one we chose was WAY larger once we got it home and in the house, than it seemed in the Wilderness.  But its beautiful.  We snacked on home made Artichoke Spinach Dip, Shrimp and Crab, watched Christmas movies and listened to Christmas music and decorated the house for Christmas!  It was a day we will never forget!  

Here's my little turkey and handsome husband:


It was such a beautiful drive:


The Christmas Tree we chose in it's natural habitat:


Our first hint, it might have been a LITTLE LARGE:


All lit up:


For those of you anxiously awaiting the announcement of the winner of the Shutterfly Challenge Giveaway- CONGRATULATIONS to Jessica Warfield!


Enjoy this start to the Holiday Season!  Many thanks, again to my loyal fans, readers and friends!


Wednesday, November 27, 2013

Quick, Cheap and Easy Thanksgiving Tablescape Ideas {Our Friendsgiving}

We've recently moved to a different city- one I lived in about 5 years ago and it holds my HEART.  We are SOOO happy to be back here and loving our more laid back life style.  For our housewarming party it was perfecting timing to host it as a Friendsgiving. {Not familiar with the term "Friendsgiving"???  Its basically Thanksgiving, but with friends and each person brings a dish- the host only does the Turkey.}

I was so excited to reconnect with all my friends in this City and host them in our new home, but was worried I wouldn't have time to make the gathering as beautiful as I wanted to.  Thankfully, the day before two friends came up from Seattle to help us celebrate and I had extra help to put together a pretty environment for our guests.
This is Ashley [I've written about her before here]


We had four different tables to sit at to accommodate everyone coming- it is important to me that everyone have a space to sit and enjoy their meal and the company.  This ended up being helpful when I didn't have 20 of the same type of table settings.  I was able to set and decorate each table a little differently and tied them all together with a few special items:

I'm Thankful For.... Kraft Paper Place-mats


Because I didn't have enough of one type of place setting to make each on the same, the placemats Ashley and I created helped to tie everything together.  I purchased a roll of Kraft Paper at Fred Meyer and used my rotary cutter and cutting mat to cut 20 rectangles the size of place mats.  Because the paper came on a roll, it REALLY, really wanted to roll back up- so we placed some heavy tool boxes from the garage on them over night to flatten them out, worked great!  
Once they were flat, Ashley used my acrylic stamp pad and my letter stamps to create a "I'm Thankful For" stamp and stamped each place setting.  We also included a nice pen so that our guests could jot down a few things they were thankful for, if they wanted.  Most did, and I enjoyed reading what they wrote as I cleaned up!

I also used wood rounds as part of the centerpieces left from our wedding to tie most of the tables together-


The four tablescapes


Vintage Rustic


An unaltered vintage wooden table with a white linen table runner, Autumn China, Beaded Leaf Centerpiece and Candlestick.

Breakfast Bar Leaf Plates


A cozy spot for two- I got to use my beautiful leaf plates at the breakfast bar setting, with a gold charger, cloth napkins and Mason Jar Mugs.

Felt Leaves and Candles


Beautiful felt leaves, Autumn China, my vintage candle stick holder, White-Trash Wine Glasses with tea light candles and some ANTLERS!!


Linen Forest


This table is three card tables with ONE LONG linen table cloth (that I quickly finished the edges of off of an interior decor fabric bolt).  Wood rounds, two rustic urns with moss and pumpkins, and a rustic green glass vase with some grape vine pumpkins and my square modern plates finish off this woodsy table.


The ONLY item I purchased to make these tablescapes for our Friendsgiving was the Kraft Paper, and it was $3.99 for the whole roll.  I encourage you to get creative with the items you have around your home, and outside your home to create some unique, and unforgettable tablescapes for your Thanksgiving Celebrations tomorrow.

I am so thankful for all of my friends that read my blog, THANK YOU-  and Happy Thanksgiving!


Thursday, November 14, 2013

{Burlap "Joy" Banner} A little bit of Embellishment goes a LONG way & GIVEAWAY!


My favorite photographer, Lindsay Porter from Lindsay Porter Photography asked me to create a banner for her upcoming Holiday Mini Session.  She wanted something simple and rustic to compliment the venue for her sessions, a Christmas Tree Farm.

I decided on Burlap and Lindsay wanted it to say "JOY".  I always sew my letters on my banners, unlike most that I see around that are painted.  [You can even follow along the tutorial I created to make your own here if you'd like to make your own!]  I feel like it gives a more professional, finished look.  After sewing the pennants and the letters, it was too plain.  I wanted the banner to be rustic, but not drab.... so I decided it needed a little EMBELLISHMENT!


I have experimented with all different types of fabric flower making from all the wonderful tutorials on pinterest.  But there was one style I hadn't tried yet... the rolled fabric flowers.  I did a quick search for a good tutorial and came across this one from jones design company.

I quickly created two cute little flowers.  Then, I used some heavy fusible interfacing to stiffen up some fabric to make some leaves and hot glued it all onto the J and Y of my banner and WHHHAAALLAAA!  See how much difference a little EMBELLISHMENT makes?!


What projects are you working on this Autumn and Winter that could benefit from a little bit of Embellishment?!  We'd love to hear about them- please leave a comment telling us about them to be entered into the giveaway for a chance to win one of these banners for yourself or to give to a friend!! And please share, share, share this post for MORE CHANCES TO WIN!


a Rafflecopter giveaway


Wednesday, October 2, 2013

Book Page Wreath


How I spent my 31st Birthday....

My lovely sister Emily of {LOLA FLORAL}, graced Madi and I with her presence for my birthday.  Kyle is on a big hunting trip in Wyoming and was gone for my birthday, and is STILL gone---we miss him so much.
So, with all that's been going on and Kyle being out of town, I was kind of a grumpy mess on my special day =(  Having Emily here was a breath of fresh air.  I love talking business with her and bouncing ideas off of each other.  

So, she asked me what I wanted to do the morning of my birthday, and I decided it would be fun to drive into Port Angeles (we are currently calling Sequim, WA home) and do a little Antiquing.  So, we got ourselves a Pumpkin White Chocolate Latte', and drove the 20 minutes to the town next door.  It was Sunday, so we weren't counting on a lot being open in a small town, but we had a great time!

We ending up pulling some inspiration from the best (only 3 half-way descent booths to draw from) booth inside an Antique Mall.  The artist had done some working with paper and made a beautiful wreath from old book pages.  I decided making one of those wreaths with my sister would be the perfect Birthday Afternoon, so we finished our Antiquing there, and stopped in at Joann's on the way back home to pick up a few supplies.  


Supply List

  • Old Book/Hymnal/Sheet Music- I have a stash that I cherish {see how I've used them before here}
  • Foam Wreath Form
  • Greening Pins (50-100)
  • OPTIONAL- Floral Ribbon, embellishments

The Process

Emily and I chose different books- and it is amazing how different our wreaths turned out- we decided sheet music would have been a fun approach, or even spray painting the edges of your book black or even a funky color before you start tearing pages out would create a unique look.

All you do, is tear a page out of your book, fold it in the middle and crumple, then push one of the pins through the middle and shove it into the wreath form.


My book pages were way thinner and way more fragile than the one Emily chose... so take that into consideration- I had to be very ginger when folding and pinning in order to not rip the pin right through.

Just repeat this process over, and over and over keeping a close eye on holes created from not putting the pages close enough together into the form.


I did put some in the "inside" of the ring and "outside/bottom" to make it look super full.


Emily wasn't happy I wanted to take her photo while she was working, because neither of us had showered, or cared what we looked like that day (perfect birthday)... but I did it anyways, and isn't she cute?!


Here's us together with our finished products- I absolutely LOVE mine and found a beautiful mirror to hang it on.  [Do make sure, you only use this wreath indoors--- the paper will soak up moisture if it is outdoors and it will be ruined]


I'd love to see photos of your's if you make one and see how you chose to embellish!


Linking Up At:


Thursday, June 13, 2013

Part 3- Rag Tie Wreath- 3 Quick Patriotic Handcrafts

My front door has been un-decorated for quite some time now... its been begging for a summer wreath.  The door was screaming "Give me some Red, White, and Blue!".

With SOOOOO many adorable patriotic wreath ideas on Pinterest it was hard to choose which direction to go with my wreath.  However, I've been having a lot of fun with "rag tie" projects lately, such as my Rag-Tie Bunting Banner and other custom orders I've had in my Etsy Shop lately, I decided it would be fun to try a rag tie wreath- in similar fashion as a tutu wreath.


My mom was over visiting from her Lavender Farm in Sequim, WA- so we got to make these together- and she had one to take home too.
We started off by cutting strips of fabric (2 inches wide and about 9 inches long.)


We cut Red, Blue and Burlap.  Then we cut the middle of the shrink plastic out of our straw wreaths my mom had for likely 20+ years and never did anything with.


Then we simply just started tying knots! 


 Mine had about 5 red strips in each red section, 2 burlap strips and a big section of blue.


And this is what it looked like after it was fully tied.  It needed something more- so I added some left over stars from my Starry Banner Handcraft.  And it turned out GREAT!


This concludes my 3 part blog series of 3 Quick Patriotic Handcrafts.  If you missed part 1 or 2 you can find them here:

I hope you'll take a few minutes and add some Patriotic Flare to your home for the coming holidays.  
Did you blog about a quick handcraft I can link up here?  Please leave me a comment!


Blogging tips