Showing posts with label the bunch. Show all posts

Tuesday, December 3, 2013

Feast on the Farm {Holiday Wreath Giveaway}


We received a very lovely package at the bunch today...
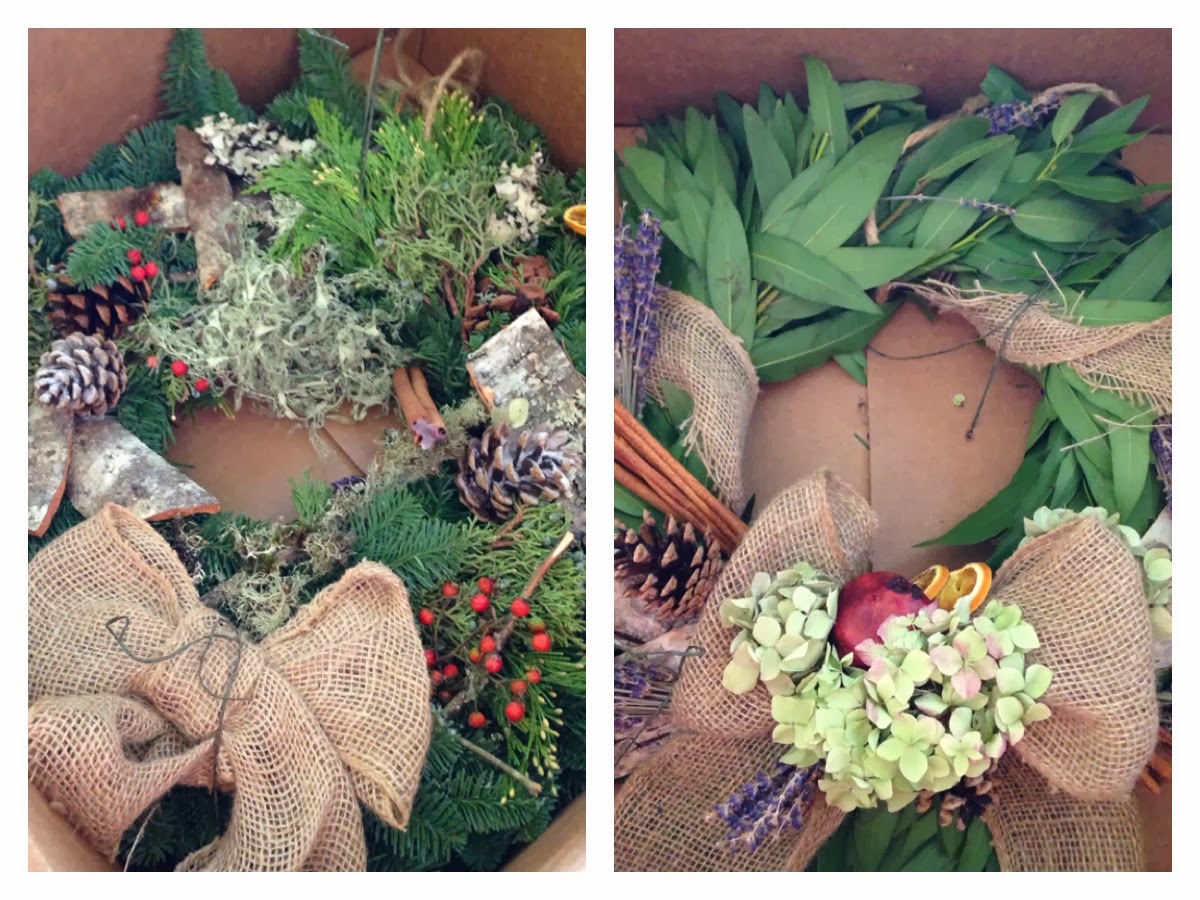
TWO Holiday Wreaths from my sister's company Lola Event Floral & Design--- and one is for a GIVEAWAY {the other is for my family to enjoy =)- thanks sis}!!!   
So, lets get this started-

THE PRIZE: 

"Feast on the Farm" Wreath:  A celebration of what makes our family lavender and herb farm great (and smell great, too). Dried lavender from the fields, bark from the surrounding woods, cinnamon, and dried flowers and fruit on a fresh bay leaf wreath.  This wreath is about 18 inches in diameter, so if you pull a leaf or two for your holiday feast, it won't be missed


HOW TO ENTER:

1. Like the bunch on Facebook and leave a comment that you do.
2. Like Lola Event Floral & Design on Facebook and leave a comment that you do.
3. Click over to Lola Floral and check out the rest of the Holiday Wreaths they offer, and consider having one sent to a loved one to spread some cheer- Leave a comment that you did- and tell us which one is your favorite.  
4. Share this Giveaway opportunity with your friends and leave a comment that you did.

When I see that you've done each of these and left me a comment telling me you've done so, I will enter you into the Giveaway!

This Giveaway will end at Midnight on 12/9 and the winner will be announced on the blog, so make sure you follow us by email, so you don't miss the opportunity if you win!  Eligible to those in the Continental USA only.  
Good luck and Thank you for entering.  AND Thank You to Lola Floral for the beautiful wreaths!


Friday, November 29, 2013

BOGO SALE and Shutterfly Giveaway WINNER

To show my Thanks to all of my readers, fans and friends, I wanted to participate in the Black Friday Maddness and offer a special discount for the next few days at the bunch's Etsy Shop.


After you've added two items to your shopping cart in the bunch shop, on the checkout screen enter the code THANKFUL2013 and the discount will be applied!  This offer is good until December 4th!

We hope you had a blessed Thanksgiving with friends and family and good food.  My little family decided to do a very non-traditional Thanksgiving together just the 4 of us [Buddy too=)].  We had a yummy breakfast and headed up tot he mountains to find and cut our own Christmas Tree in the Mt. Baker National Forest.  The one we chose was WAY larger once we got it home and in the house, than it seemed in the Wilderness.  But its beautiful.  We snacked on home made Artichoke Spinach Dip, Shrimp and Crab, watched Christmas movies and listened to Christmas music and decorated the house for Christmas!  It was a day we will never forget!  

Here's my little turkey and handsome husband:


It was such a beautiful drive:


The Christmas Tree we chose in it's natural habitat:


Our first hint, it might have been a LITTLE LARGE:


All lit up:


For those of you anxiously awaiting the announcement of the winner of the Shutterfly Challenge Giveaway- CONGRATULATIONS to Jessica Warfield!


Enjoy this start to the Holiday Season!  Many thanks, again to my loyal fans, readers and friends!


Friday, November 1, 2013

Gender Neutral DIY Baby Shower Gift Ideas

I am headed to one of my best friend's baby shower this weekend, and I am super excited to see all the ladies and babies!  However, this strong friend of mine has held out in finding out what the gender is of her FIRST BABY at the request of her husband!  This is fun and exciting and all, but it makes gift giving difficult.  Especially when I want to hand-craft gifts special, just for this little sweetie.
Aimee has special requested one of my {Monthly Onesie Sets} as her baby shower gift, but I don't want them to be gender neutral, so those will have to wait.  BUT, I can't show up EMPTY HANDED, right?!
So, I went on a Pinterest Hunt to come up with some cute, and easy gifts for options to take to the shower.

I hope you enjoy my collection of DIY Gender Neutral Baby Shower Gifts below! [Click the image to follow a link to the tutorial]

Burp Cloths


Do Not Disturb Sign


Diaper Caddy/Organizing Bin


UpCycled T-Shirt Bibs


Soft Blocks


Closet Dividers


Alphabet Art


Nursing Cover


Taggie Blanket


Baby Blocks


And of course, what I've schemed up to make, I cannot find a tutorial for--- so I guess I will have to make my own for you all!

It's along the same ideas as this:

Christmas Card Book


I better get started!  Stay tuned to see what I've come up with!


Monday, October 14, 2013

Halloween Decor {Boo REVAMPED}

I love saving stuff from the dump- especially something that has sentimental value.  But, ONLY if I can put it to good use!

My mom was SOOO good at making each and every holiday special for us kids in some way (which I've written about before), and I love thinking back on my childhood and remembering those things she did (mostly VERY cheap, or even free things) to make each little holiday special, in some way.

Most of the time those special feelings were created with the use of crafty decor.  I'm not sure where she came up with this Halloween Sign- but it isn't half bad, really.  And I couldn't stand to let it get tossed into the "dump" pile as we were cleaning out the garage last week.


I remembered that I purchased a BLACK feather wreath on 75% off clearance at Joann's last winder and then knew exactly what I would do with them!  


I cut it all apart and ended up with these three "BOO" letters that were in desperate need of painting.


After some "Vintage White" spray paint (about 6 coats to cover up the splatter paint), they were beautiful.


I used some black sturdy ribbon, strategically hot glued to the rear of each letter to tie them on the wreath individually.  I paid close attention to what direction I wanted my letters hanging out to figure out which direction to glue on the ribbon.

My mom, is MASTER of bows--- she can make them big and beautiful or small and beautiful- unfortunately a skill I have yet to learn from her, but I love to watch each time- hoping I will learn.
She made me a beautiful bow with some vintage style black and white striped ribbon to adorn on the wreath.


It turned out simple and beautiful, exactly what I wanted.


A little something to add to my so-far small collection of Halloween decor to assist in making Madisyn's holiday a little more special.

Did you make a wreath this year for Halloween?  I'd love to see and hear about it- please leave links in comments!


Linked Up At:
Wow me Wednesday at Ginger Snap Crafts
Wonderful Wednesday at Ducks in a Row
Show and Share Wednesday at Mostly Homemade Mom


Tuesday, August 6, 2013

How I {Ombre'} & our Late Summer Mantle

Ombre' was all the hot talk for a while there {maybe it still is?!}... but the only way I ever really got into the style was through my painted signs.  I've experimented with blending colors to create a Ombre' look with many colors now, and always LOVE how it turns out.
Here's what I do:

I start with 4 equal sized wood boards, sanded smooth with finished edges.  You could experiment with different sizes, as well!

I pour a good sized amount of paint in a paper plate.  [side note: I LOVE the paint mistake section at hardware stores!!!  Have not heard of it?!  Well, you need to find it!  Most of the time there is a shelf behind the back side of the paint mixing counter where you will find all different sizes of "paint mistakes".  They are priced amazingly and you will often find fun colors that freaked someone out and they decided not to buy.  My lovely husband is such a good sport letting me buy 1 or 2 almost every time we go to the hardware store... consequently I have a pretty fun selection of paint colors in the garage!  You need to check it out if you have not already.]  I always start with the color as it comes out of the can for the first board.


It is important to get a really good coat on the first time, because you WILL NOT BE ABLE TO DUPLICATE THESE COLORS to paint a second coat.  Make sure you don't miss any spots!

Then, I add a small amount of either a light or dark base depending on if I want a darker color or lighter.  I went with a cream for this project.


Stir it around well (I use disposable foam brushes) and then paint the next board.  You want it to be a subtle change in color, but enough to notice.


Now you just repeat that process 2 more times (or however many Ombre' shades you are going for).


And you end up with this...


I usually start and end with my two mixing colors so there are two MIXED colors in the middle- but there are no RIGHT ways to do Ombre'... just have fun!

Here's what my sign looked like all put together-


And here's a shot of the back so you can see how I hold them all together.  I do have a KREG Jig- that I could use to pocket hole screw them together- but this was a just a quick project- (I usually make a sign for every mantle change- so it has to be quick).


I wanted to use this sign to pull together some beautiful finds from the Sequim Lavender Weekend we brought home for a Late Summer Mantle.  I roughed up the edges a bit and added some vinyl.  Then a tied a quick burlap bow and glued together a mini paper bunting!


Here's how it all came together- Fresh Lavender, Bunnies, unique Urns, Wine Corks and Wicker Balls- all somehow say "Celebrating Late Summer" to me!


I'd love to hear about or see How YOU Ombre'- please share with comments!


Linked up at:


Thursday, July 25, 2013

[Cars and Trucks] Drawer Pulls- FREE SILHOUETTE CUT FILES


One of Madisyn's best friends, Hunter is a few weeks older than her.  He celebrated his 2nd birthday last weekend!  Time has flown since our babies were born, where did our little babies go?!
I try really hard to gift personal, thoughtful gifts for close friends.  I wanted to make something for Hunter and his Mom told me that she had yet to order drawer pulls for his new big boy "Car and Truck" bedroom.  I asked her if I could make them for him, and she said YES!

We bought 6, high quality metal drawer pulls from Home Depot that had a large, flat surface to apply some car and truck vinyl.


I created 6 different Silhouette files for cars and trucks to cut my 1.5 inch wide shapes out of primary colored permanent vinyl.  Some of them proved to be more difficult than others due to very small cut lines and removing the pieces necessary to create negative space.  {My trick for this is to use a very sharp dental pick... shhhh... don't tell anyone.}
Kyle quickly drilled some holes in a scrap piece of stained wood we had, that presented the pulls very nicely as a gift.  


The pulls came out exactly how I envisioned them and Hunter and Mommy Candace LOVED them!  Success!


I wasn't able to host the Silhouette Files on my webpage to download for some strange reason.  So, please leave a comment with your email address and I will send them to you!  I'd LOVE to see what you make with them!


Linking Up at these fabulous Parties:


Blogging tips