Showing posts with label Entertaining. Show all posts

Tuesday, December 3, 2013

Feast on the Farm {Holiday Wreath Giveaway}


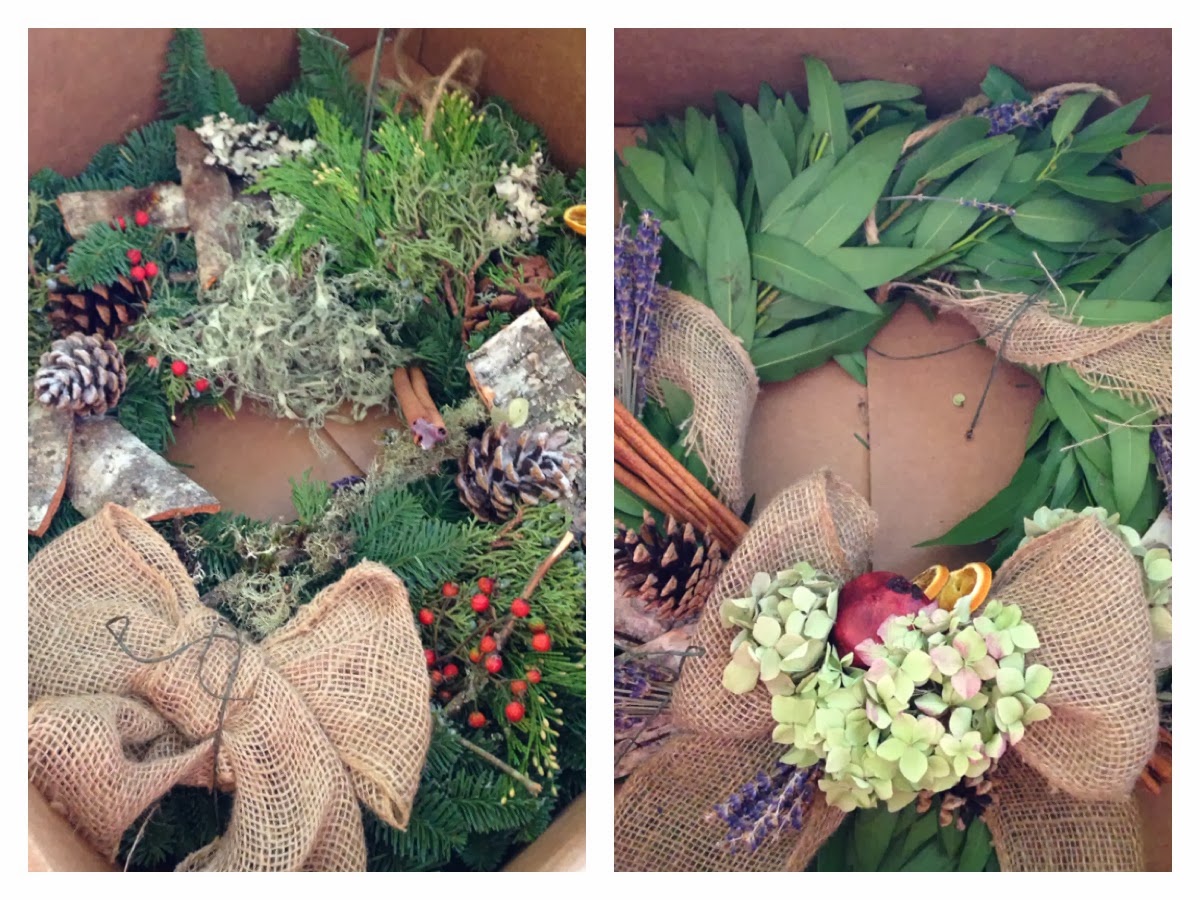
We received a very lovely package at the bunch today...

TWO Holiday Wreaths from my sister's company Lola Event Floral & Design--- and one is for a GIVEAWAY {the other is for my family to enjoy =)- thanks sis}!!!   
So, lets get this started-

THE PRIZE: 

"Feast on the Farm" Wreath:  A celebration of what makes our family lavender and herb farm great (and smell great, too). Dried lavender from the fields, bark from the surrounding woods, cinnamon, and dried flowers and fruit on a fresh bay leaf wreath.  This wreath is about 18 inches in diameter, so if you pull a leaf or two for your holiday feast, it won't be missed


HOW TO ENTER:

1. Like the bunch on Facebook and leave a comment that you do.
2. Like Lola Event Floral & Design on Facebook and leave a comment that you do.
3. Click over to Lola Floral and check out the rest of the Holiday Wreaths they offer, and consider having one sent to a loved one to spread some cheer- Leave a comment that you did- and tell us which one is your favorite.  
4. Share this Giveaway opportunity with your friends and leave a comment that you did.

When I see that you've done each of these and left me a comment telling me you've done so, I will enter you into the Giveaway!

This Giveaway will end at Midnight on 12/9 and the winner will be announced on the blog, so make sure you follow us by email, so you don't miss the opportunity if you win!  Eligible to those in the Continental USA only.  
Good luck and Thank you for entering.  AND Thank You to Lola Floral for the beautiful wreaths!


Wednesday, November 27, 2013

Quick, Cheap and Easy Thanksgiving Tablescape Ideas {Our Friendsgiving}

We've recently moved to a different city- one I lived in about 5 years ago and it holds my HEART.  We are SOOO happy to be back here and loving our more laid back life style.  For our housewarming party it was perfecting timing to host it as a Friendsgiving. {Not familiar with the term "Friendsgiving"???  Its basically Thanksgiving, but with friends and each person brings a dish- the host only does the Turkey.}

I was so excited to reconnect with all my friends in this City and host them in our new home, but was worried I wouldn't have time to make the gathering as beautiful as I wanted to.  Thankfully, the day before two friends came up from Seattle to help us celebrate and I had extra help to put together a pretty environment for our guests.
This is Ashley [I've written about her before here]


We had four different tables to sit at to accommodate everyone coming- it is important to me that everyone have a space to sit and enjoy their meal and the company.  This ended up being helpful when I didn't have 20 of the same type of table settings.  I was able to set and decorate each table a little differently and tied them all together with a few special items:

I'm Thankful For.... Kraft Paper Place-mats


Because I didn't have enough of one type of place setting to make each on the same, the placemats Ashley and I created helped to tie everything together.  I purchased a roll of Kraft Paper at Fred Meyer and used my rotary cutter and cutting mat to cut 20 rectangles the size of place mats.  Because the paper came on a roll, it REALLY, really wanted to roll back up- so we placed some heavy tool boxes from the garage on them over night to flatten them out, worked great!  
Once they were flat, Ashley used my acrylic stamp pad and my letter stamps to create a "I'm Thankful For" stamp and stamped each place setting.  We also included a nice pen so that our guests could jot down a few things they were thankful for, if they wanted.  Most did, and I enjoyed reading what they wrote as I cleaned up!

I also used wood rounds as part of the centerpieces left from our wedding to tie most of the tables together-


The four tablescapes


Vintage Rustic


An unaltered vintage wooden table with a white linen table runner, Autumn China, Beaded Leaf Centerpiece and Candlestick.

Breakfast Bar Leaf Plates


A cozy spot for two- I got to use my beautiful leaf plates at the breakfast bar setting, with a gold charger, cloth napkins and Mason Jar Mugs.

Felt Leaves and Candles


Beautiful felt leaves, Autumn China, my vintage candle stick holder, White-Trash Wine Glasses with tea light candles and some ANTLERS!!


Linen Forest


This table is three card tables with ONE LONG linen table cloth (that I quickly finished the edges of off of an interior decor fabric bolt).  Wood rounds, two rustic urns with moss and pumpkins, and a rustic green glass vase with some grape vine pumpkins and my square modern plates finish off this woodsy table.


The ONLY item I purchased to make these tablescapes for our Friendsgiving was the Kraft Paper, and it was $3.99 for the whole roll.  I encourage you to get creative with the items you have around your home, and outside your home to create some unique, and unforgettable tablescapes for your Thanksgiving Celebrations tomorrow.

I am so thankful for all of my friends that read my blog, THANK YOU-  and Happy Thanksgiving!


Wednesday, November 6, 2013

Baby Shower {Greeting Card Scrap Book} Kit

What do you do with all the beautiful greeting cards you receive for your child's first birthday, or in the mail for Christmas, or on your Wedding Day???  Well, I am the type of person that has a hard time throwing them away, but they just end up sitting in a keepsake box tucked away on a shelf.

THE SOLUTION

I've come across  a concept  over the past few years on blogs, Pinterest, etc and I think it is fabulous.
But, I think there is a way to take this concept up a notch and not only include those beautiful greeting cards in the scrapbook, but use them as backdrop for photos from the event, journals, keepsakes and more! [Click the photo to be taken to one lovely blog post with the idea]


SOOOOO....I've been saving the cards we receive for different milestones and holidays to create this style of scrap book ever since, but have not taken the time to put one together yet.  Here's the bin I've been saving all of Madisyn's Baby Shower Cards in....


As you can read here, I needed a gift for a Gender Neutral Baby Shower and wanted it to be something useful, unique and memorable.  I figured it was the perfect time to make myself put together one of these scrapbooks for someone else, so that I would know exactly how I want to do mine that I've been saving all my cards for.

So, I went through Madisyn's books and found that we happened to have two copies of the Pokey Little Puppy.  This is the perfect, classic, and gender neutral book to create this kit with!

I started by using a box cutter and carefully cut off the front and back cover of the book right along the spine.


And ended up with a front and a back for the scrapbook.


I gathered some gender neutral colored supplies (ribbon, cardstock, patterned paper, etc) and some binder rings and started to put it all together.


Using my book binding punch, I made 3 holes in the covers for the binder rings.


Then, I Mod Podged some patterned paper on the inside of the covers for a spot to include the Invitation to the party on the inside of the cover and a Guest List in the back.  


I also included a few blank patterned pages inside in case she needs extra room to journal or anything.  To complete the kit, I gathered photo corners, some extra coordinating card-stock pieces, a sharpie to write down the gifts and guests at the party, and a hole puncher.


Then, I created a little celo bag to put it all together in and made a cute little tag for the top!  To make the tag, I just measured a half an inch on either side larger than the envelope and folded a piece of paper, then stapled it onto the top of the bag and glued my letters over the staples.


And here it is all together (with the Mod Podge not yet dry behind the letters).


In her gift basket I also wanted to include the What to Expect- The First Year book that I used as a reference with Madisyn.  I enjoyed this book, and thought it might be special for her to thumb through the same one I used (and there's no sense in buying another book, when I already had it and don't need it anymore!)


It turned out great, and I can't wait to see it after she puts it all together.  Now, I just need to pull out another duplicate book and get Madisyn's made! [I will certainly do a follow up post so you can see how the greeting cards are used to mount photos, keepsakes and more!]

I did create a Silhouette cut file for this project that I'd be happy to email to you for the wording on the tag- just leave me a note!

I'd love to hear about the Greeting Card Scrap Books you make with this concept- the possibilities are endless!  Your comments make my day!


Linked up at:


Tuesday, August 13, 2013

My First Curated Collection

I am a Looksi Square Curator.  That means, once a quarter I get to put together a collection of what I consider to be the finest of ANYTHING.  I've been loving the idea of chillin' in the evenings this autumn in the back yard, by the fire, with yummy food, drink and a beautiful atmosphere so I decided to use that as a theme for my first Curated Collection:


The look, feel, and taste of this setting is what I will be creating with this collection of other blogger's DIY posts, stay tuned until Friday!


p.s.  Our little family is in the process of a BIG move- my apologies for being more absent than I'd like for the last little bit and through the end of this month.  Please keep us in your thoughts and prayers that we can get everything done!


Tuesday, June 11, 2013

Part 2- God Bless America Sign- 3 Quick Patriotic Handcrafts

My mantel decor is almost never complete with out a sign of some kind...and this time I didn't have one already made that would suffice.


The hubby and I were in the garage working on my Shutterfly and Looksi Creative Brand Collaboration Challenge and I spotted a VERY OLD piece of scrap wood that would make a beautiful sign.  I picked the piece off of a garage built in the early 1900's in downtown Renton- it was a piece of molding around a window.  The gracious owners also let me purchase the doors off the garage- they were original barn style garage doors- beautiful- and still in my garage awaiting the perfect home (against the will of my LOVING husband).


I cut the beautiful board into 3 equal lengths and used a scrap 1x2 to secure them together.  We hadn't yet replaced our finish-nailer that was stolen during our break-in so I had to use screws, a bit overkill- but oh well!


Because this wood is SOOOO old, I took extra precautions when sanding its rough edges after I cut the boards.  I was worried about the paint- so I wore a mask while sanding.  I sanded more than I typically would, because I used another one of these boards for one of my You Light Up My Life Lamps and I struggled to get the vinyl to stick on that project.  I was hoping some extra sanding would take care of this issue.


With it all sanded up, and secure together I took it inside and applied some vinyl!


I left the bottom pannel empty because I wanted to do some embellishing.  I splurged, with a gift certificate my lovely sister gave me for my birthday last year, on some burlap ribbon.  This is the look I wanted since I knew I would be using burlap in my wreath (part 3 of my patriotic tutorials) and its always nice to tie things together.  
So, I tied a simple knot with some burlap- decided it needed some color and added in some bright blue rick rack.  
Finished it off by hot gluing some small white stars left over from my Starry Banner and a simple  button heart.  
And THAT'S ALL!  Simple, quick and easy!


Our final and part 3 to our series will be a Patriotic Wreath- I hope to get it posted tomorrow- but we have a new baby to welcome to our family! I am determined to go see Madisyn's new baby cousin, Arabella, at the hospital tomorrow night- so you might see our Patriotic Wreath post on Thursday!  Can't wait to share.


Linked Up At: 


Saturday, April 13, 2013

It's Never too Early to Plan Ahead- My Top 10 Father's Day Pins

I just scheduled my Father's Day Pinterest Party- and I got excited- and started searching for Pins.  I added some really fun ones that I had not seen last year to my Father's Day Pinterest Board, and had to share some with you.  Below, you will find my-


Neck Tie Wreath

My Husband ALMOST NEVER wears ties, but I cannot resist this adorable Tie Wreath- we WILL need one on our front door!


Dad Garland

This would be a super cute mantel banner for Dad's Special Day.

Love You to Peices

Kyle loves Candy, this would be a easy win!


Daddy Subway Art

Again, a great addition to a Father's Day Mantel.


Nuts About Daddy

What Daddy doesn't love NUTS?!


Super Dad Party

It would be very fun to throw a Father's day party for all our friends!  And this is a very cute theme.


Tee-Rific Dad

Daddy Loves Golf!  A thoughtful, inexpensive way to honor Dad.

Photo Art Gift

SOOOOO sweet!

Hero & Love

Once we have two, Dad will need this!

Candy Caddy

More Candy, a surefire way into Daddy's Heart!

It's never too early to get some ideas!  Enjoy!

Tuesday, April 9, 2013

"Welcome Little Jelly Bean" Baby Shower


A Few Weeks ago I teased my followers on Facebook with this...   

And now I will REVEAL!!!


My best friend Toni and her husband Burton are expecting a baby boy this May!  I could not be MORE excited.  They are meant to be parents and I am so thrilled they get to partake in this blessing of life!

Toni is from England, and she is very humble and kind in a way that is hard to describe- maybe it's because she's from England, maybe not?!  Anyway, she was thinking all along that she was going to throw her own baby shower... UMMMM, NO!   It is their first baby and they wanted a co-ed shower to celebrate with all their friends and family.  Of course I told Toni as soon as I thought of it, that I'd be throwing her baby shower- she kept trying to tell me no, but I didn't let her.

It was the first baby shower I had the honor to throw, and I was EXCITED to start planning!  With the help of three of her other close friends, the theme of Jelly Bean developed. (Toni had been calling her little William growing inside her a "little jelly bean")

I had tons of fun making machine sewn banners with paint chips (of course got the idea from the Paint Chip Egg Garlands all over Pinterest).  I used my Shilhouette to cut the letters, my rounded corner punch to round the corners of the squares that didn't come that way and I hand cut all the Jelly Bean shapes.


To machine sew each tag together with the others I sewed them on top of wax paper and then just tore off the wax paper when we were ready to hang them!


We ended up with one REALLY LONG "Welcome Little Jelly Bean" and 3 just Jelly Bean Garlands.  The "Welcome" one I hung over our Treat Table, 1 Jelly Bean on a Entry Window, 1 over the Kitchen Window and 1 on the Mantel where the gifts would be.


I made the WILLIAM letters with finished wooden letters from Joann's.  Just spray painted them alternating in Blue, Orange and Brown and then I Modge Podged a coordinating paper on the fronts of the brown letters.  Toni wanted letters for Williams room, so I figured these would make a cute piece of decor for the shower that could then be a gift from us that she uses in his nursery.


For favors I used the containers that we use for Cedarbrook's Bath Salts and made a custom label for them to create a keepsake for Toni and Burton's Guests to fill with Jelly Beans and take them home with them!


I had a lot of fun making the apathocary style vases to house the Jelly Beans.  I intended for these to be their own separate blog post weeks ago when I made them, but when my phone crashed I lost my progress photos I had taken of them while they were being made.  But for those of you who are interested-
  1.  I found 6 similar candle sticks at thrift stores.  
  2. Primed and Painted them white (about 6 coats).  
  3. Used E6000 glue and attached glass cylinders I found in sets of 3 at IKEA for $9! 
I used them for my Easter Decor before this baby shower and they were so cute with Easter Eggs.  I am excited to use them in the future with all sorts of fun things inside!


To fill each vase  it took almost all of the 15 lbs of Jelly Beans we ordered.  I found a great online source for Candy Bar Candy- Superior Nut Company had WONDERFUL customer service and I highly recommend them!

To incorporate the Tulips in the vases I found misc. cups that would fit inside the cylinder (but still allow room around the glass for Jelly Beans).  Filled them with water, then covered with Plastic Wrap (so the jelly beans wouldn't go in the water when I poured them in).  Put the tulips in the glasses pushing the stems through the plastic wrap, and then poured the jelly beans in the cylinders.   I made sure there was one vase that was just Jelly Beans in each color and placed a spoon in the top for guests to be able to fill their take away gifts!


You can see in this photo  that I used left over Paint Chips as signs to identify food for people so they didn't have to guess what things were.


 For the Dessert, Amber and her Mom made the yummiest and most adorable Jelly Bean Cake Pops (Once again, I AM NOT A BAKER- so I delegated this, and they did SOOO WELL!)  


Amber also did a Bath Tub Punch (click to find the wonderful blog the idea came from) which was very yummy and bright blue with floating bath duckies for Mr. William to enjoy later!

For food we decided on a Slider Bar, I didn't end up getting photos of the whole thing, but it was delish and looked pretty too!  My dear Kyle made 60 PERFECT Ranch Beef Sliders and I made Turkey, Spinach Feta as well!  


Water bottle labels were simply covered in coordinating paper, just to be cute.


Toni wasn't excited about her guests participating in and traditional baby shower games, so we just ate, drank, opened gifts and socialized.  I did however put together a keepsake book for William.  Each guest got to write "WISHES FOR WILLIAM" on a page of the book.  I found the page template here and just modified it to fit the size page I was using.


A good time was had by all, and I was honored to throw a party for such a good friend.  I could not have done it without Amber, Allie and the other Tracey- thank you ladies! (I wish we got a photo together, we didn't so a few of Toni and I will have to suffice- followed by some photos of guests enjoying themselves in the beautiful weather we had and of course I can't resist cute babies).


Thank you for looking, I hope you found some inspiration!

Featured At:

Linked Up At:


Blogging tips