Showing posts with label Gardening. Show all posts

Tuesday, December 3, 2013

Feast on the Farm {Holiday Wreath Giveaway}


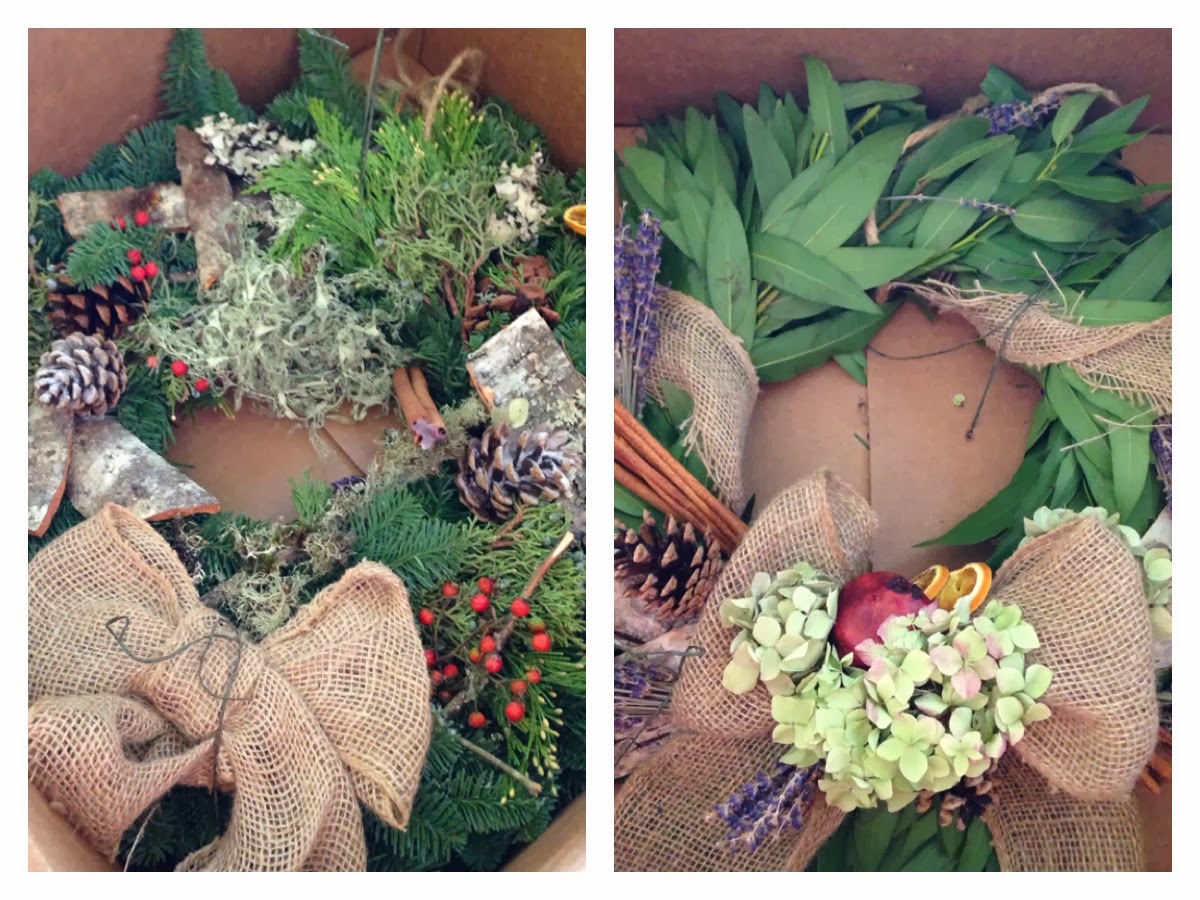
We received a very lovely package at the bunch today...

TWO Holiday Wreaths from my sister's company Lola Event Floral & Design--- and one is for a GIVEAWAY {the other is for my family to enjoy =)- thanks sis}!!!   
So, lets get this started-

THE PRIZE: 

"Feast on the Farm" Wreath:  A celebration of what makes our family lavender and herb farm great (and smell great, too). Dried lavender from the fields, bark from the surrounding woods, cinnamon, and dried flowers and fruit on a fresh bay leaf wreath.  This wreath is about 18 inches in diameter, so if you pull a leaf or two for your holiday feast, it won't be missed


HOW TO ENTER:

1. Like the bunch on Facebook and leave a comment that you do.
2. Like Lola Event Floral & Design on Facebook and leave a comment that you do.
3. Click over to Lola Floral and check out the rest of the Holiday Wreaths they offer, and consider having one sent to a loved one to spread some cheer- Leave a comment that you did- and tell us which one is your favorite.  
4. Share this Giveaway opportunity with your friends and leave a comment that you did.

When I see that you've done each of these and left me a comment telling me you've done so, I will enter you into the Giveaway!

This Giveaway will end at Midnight on 12/9 and the winner will be announced on the blog, so make sure you follow us by email, so you don't miss the opportunity if you win!  Eligible to those in the Continental USA only.  
Good luck and Thank you for entering.  AND Thank You to Lola Floral for the beautiful wreaths!


Wednesday, November 27, 2013

Quick, Cheap and Easy Thanksgiving Tablescape Ideas {Our Friendsgiving}

We've recently moved to a different city- one I lived in about 5 years ago and it holds my HEART.  We are SOOO happy to be back here and loving our more laid back life style.  For our housewarming party it was perfecting timing to host it as a Friendsgiving. {Not familiar with the term "Friendsgiving"???  Its basically Thanksgiving, but with friends and each person brings a dish- the host only does the Turkey.}

I was so excited to reconnect with all my friends in this City and host them in our new home, but was worried I wouldn't have time to make the gathering as beautiful as I wanted to.  Thankfully, the day before two friends came up from Seattle to help us celebrate and I had extra help to put together a pretty environment for our guests.
This is Ashley [I've written about her before here]


We had four different tables to sit at to accommodate everyone coming- it is important to me that everyone have a space to sit and enjoy their meal and the company.  This ended up being helpful when I didn't have 20 of the same type of table settings.  I was able to set and decorate each table a little differently and tied them all together with a few special items:

I'm Thankful For.... Kraft Paper Place-mats


Because I didn't have enough of one type of place setting to make each on the same, the placemats Ashley and I created helped to tie everything together.  I purchased a roll of Kraft Paper at Fred Meyer and used my rotary cutter and cutting mat to cut 20 rectangles the size of place mats.  Because the paper came on a roll, it REALLY, really wanted to roll back up- so we placed some heavy tool boxes from the garage on them over night to flatten them out, worked great!  
Once they were flat, Ashley used my acrylic stamp pad and my letter stamps to create a "I'm Thankful For" stamp and stamped each place setting.  We also included a nice pen so that our guests could jot down a few things they were thankful for, if they wanted.  Most did, and I enjoyed reading what they wrote as I cleaned up!

I also used wood rounds as part of the centerpieces left from our wedding to tie most of the tables together-


The four tablescapes


Vintage Rustic


An unaltered vintage wooden table with a white linen table runner, Autumn China, Beaded Leaf Centerpiece and Candlestick.

Breakfast Bar Leaf Plates


A cozy spot for two- I got to use my beautiful leaf plates at the breakfast bar setting, with a gold charger, cloth napkins and Mason Jar Mugs.

Felt Leaves and Candles


Beautiful felt leaves, Autumn China, my vintage candle stick holder, White-Trash Wine Glasses with tea light candles and some ANTLERS!!


Linen Forest


This table is three card tables with ONE LONG linen table cloth (that I quickly finished the edges of off of an interior decor fabric bolt).  Wood rounds, two rustic urns with moss and pumpkins, and a rustic green glass vase with some grape vine pumpkins and my square modern plates finish off this woodsy table.


The ONLY item I purchased to make these tablescapes for our Friendsgiving was the Kraft Paper, and it was $3.99 for the whole roll.  I encourage you to get creative with the items you have around your home, and outside your home to create some unique, and unforgettable tablescapes for your Thanksgiving Celebrations tomorrow.

I am so thankful for all of my friends that read my blog, THANK YOU-  and Happy Thanksgiving!


Tuesday, July 16, 2013

An Invitation...Lavender Farm Faire- Sequim's Lavender Weekend


Lavender flows through my family's body like blood.  About 10 years ago my family picked up our roots in the Seattle Area and moved over to the little town of Sequim on the Olympic Peninsula in Washington State.  We purchased a 10 acre Lavender Farm with a Historic Home as a Gift Shop and a Restaurant in a separate greenhouse style building.  It was exactly what my mom thought she wanted as her retirement.
Things didn't go as smoothly as planned with the downturn of the economy, and there have been  a lot of changes on the farm (I wrote a bit about them in my Barnwood & Vintage Window Planter post, if you want to read more).
Needless to say, we still have a Online and Wholesale Lavender Based Business and some beautiful fields to tend.  Each year, the 3rd full weekend in July, the whole City of Sequim lays out the Lavender Carpets for guests from all over the globe to come enjoy All Things Lavender at the Sequim Lavender Farm Faire
My sister, Emily from Lola Floral, Madisyn and I headed out to Sequim (a 2 hour drive from the Seattle Area) this morning to help pull the last minute preparations together for our Pop Up Shop we create at Lavender in the Park each year.  It is a TON of work to put it all together, but it is always very fun and worth the stress.

We spent our day putting together our Baking Mixes, such as Cranberry Lavender Scone Mix and Lemon Lavender Shortbread; Labeling our Bath & Body Products and pulling out vintage treasures we use as Display Pieces (and all are for sale) to create our Pop Up Shop.  It always portrays the character of the farm, even though the Shop is off site, you feel as though you've stepped into a French Country Market.


Emily and I wanted to cordially invite you to attend, please come say "hi" to us at Lavender in the Park.  Or, if you are unable to attend in person, you can always visit our Lavender Shop Online at www.CedarbrookLavender.com.  the bunch will be taking over all of our vintage treasures, woodwork and Bath & Body Products as well!


We are in the final phases of re-branding our product line, and are VERY excited to debut it with our Purely Lavender products this weekend!  I can't wait to post some photos!

For now, enjoy some photos I took on the farm today.


Friday, July 12, 2013

Backyard Garden Fence Quote Project--- I need your help...

Hello Friends!  I have come up with a really fun idea to make use of some large vintage windows that were given to me.  The large ones are always hard to make use of- and I have a surplus, so I've been trying to think of a way to use them in our back yard to add some personality.
We are renting, so we have not created any "outdoor" spaces like I would in a home I own, but a project like this could be taken with us when we go, so it is perfect.

I want to take these:

Add some bright and beautiful vinyl quotes or designs and hang them along this fence:


So, I can't decide on a theme; should it be garden or growth themed using the same or a similar quote to the one I put on my Barnwood and Vintage Window Planter Box?  I do love that quote, and I could spread it out over the 5 windows.

Or I could just do inspirational words?

Or images- like a vine, or simple single color flowers such as these- Just one Large per window-


What do you think would be cool?

I'd love to hear your opinions/ideas.  Please comment and have a great Friday!  The WEEKEND is upon us!


Sunday, May 12, 2013

My Mother's Day Creation- Barnwood and Vintage Window Planter and a FREE PRINTABLE!!!


Happy Mother's Day!!!

This is my second Mother's Day, officially- and I feel honored to be a part of this club.  As I was reading through quotes to find the one I wanted to put on my project for my Mother, many of them brought tears to my eyes upon taking time to reflect on what they really meant.  I wanted to pick a quote that would inspire my mom in the place she is currently in life.
My mom thought she had her "dream come true" life, when she purchased Cedarbrook Lavender & Herb farm almost 10 years ago.  At first it was amazing, then it got really tough when she realized she had to focus WAY more on "business stuff" than what she really enjoyed doing on her flower farm.  As soon as she got comfortable splitting her time between business and the pleasure the farm brought her, the economy took a down turn.  With that big change, came a whole new set of challenges which has lead to a drastic change in her daily life activities.  
I am proud to say, that she is FINALLY, ALMOST at a point where she will, again, be able to enjoy flowers because her dream is back in sight and possible- although VERY different from what is was initially.  I hope this gift I made for her, sitting in front of her new little home, will remind her on a daily basis to DREAM!

Dreams

It is SOOO important to Dream.  If you don't dream and make goals how will you get ANYWHERE!?  I have this discussion with my husband often, as he and I think very differently.  I am a Dreamer down to my heart of hearts, hence why I am an Entrepreneur.  I have been working very hard lately on a project that will change my little family's life DRASTICALLY, and I am SOOO excited about where it will take us. Only because I Dream for a future where we can live life comfortably in a way and place we are happy.  Please keep me in your thoughts and prayers this next week as hopefully all my hard work will begin to pay off!  And DREAM BIG for your life, you never know what might become reality if you dream it!
Enough philosophical babble- and on to my fun project!

Step by Step - Barnwood & Vintage Window Planter

I always start a project by perusing through my stashes of materials in the garage, on the side of the house and on our back patio- I knew I wanted to make a planter box for my mom for Mother's Day, but I didn't know what style.  After some inspiration gathering on Pinterest, as always, I had some ideas in my head, but went to take a look at what I had to work with.  I decided it was time to use one of my vintage windows that have been sitting around for a while.  I also picked up some scrap wood for the structure and base from the side of the house- and I picked out a piece of barnwood to use for the outside walls.


Step 1

I set up my window on my work bench and figured out how deep I wanted my planter box to be.  Then I measured the long piece of scrap wood to figure out if it was long enough to cut into 3 sections to create the base for the planter.  


After I cut the 3 equal pieces and laid them out under my window, I realized the gap between them would be large enough for a significant amount of soil to leak through.  So, I found a scrap 1x2 to add into the mix, making the gaps between the board basically nonexistent.


Step 2

Seeing as I only had my two hands working on this project, it is very difficult sometimes to hold pieces into place when you are screwing them together in a manner that they won't move.  To help combat this issue, I always start my screws by getting the screw into the wood before I attempt screwing into the other piece   Just like this-


Then, I was able to hold everything together where I wanted it and begin to push the screws into the other piece of wood.


Step 3

With my base all secured to the bottom of the window, I laid out some scrap 1 x 2's to create a frame for the top of the planter box.  Attaching this frame to the window was challenging because I had to make sure I wasn't screwing into the glass set inside the frame.  I also had to pay close attention to screwing into an odd angle on the back side of the frame.


This frame was to be secured into the middle of the window frame where I wanted the top of the planter box to be.  Again, only having two hands, I had to get creative in how to support the frame in a way that I could get it secured in place.  I ended up stacking misc items under the top of the window frame to put it at the same height as the bottom where I screwed on the base.  Then I was able to slide the 1x2 frame under it and screw in through the backside of the window frame into the 1x2's.


You can see that the base boards are all wonky-  this is because they are not straight (one of the challenges that arise from using scrap wood for building projects).  Luckily, you can always force the boards to be somewhat straight when you attach the other side to something- as you will see in the next step.

Step 4

With the base and top support screwed into the window frame, I was able to attach the barnwood to the outside to create the walls for the planter.  I set the barnwood on its side on each side of the planter and marked where I needed to cut.  I made sure to have the two sides go from the very back of the window frame to the front edge of the frame and base.  The front piece then covers the raw edge of the sides giving a more seamless look.


I used wood glue and finish nails to attach the sides- needed to be strong enough to hold it all together with the dirt and plants inside, but I didn't want to see any screws.

And, then it was ready for planting!


It was beautiful after I planted the flowers and they will grow in to be stunning in a few weeks.  I used lobelia around the front and side edges, when it lobelia grows along an edge, it drapes down- and will be so pretty.


I love how it turned out, but it needed something else... and that's where the quote comes in.  I wasn't happy with any of the stock quotes available in the Silhouette online store, so I used my software and created my own, and I am happy to share it with you.  Click on the image below to be directed to the PDF that you can download- feel free to use it however you'd like (but please be sure to share photos!)


Did you make something crafty for your Mom this Mother's Day?  We'd love to see or hear about it- tell us or link us in a comment!


Linked Up at:


Tuesday, April 23, 2013

Grow Your Own Wheat Grass in a Week! (Bringing some Earth Inside- Belated Earth Day Post)

Happy Earth Day, a day late

I thought, what better way to celebrate Earth Day, than to show you how you can bring a little Earth Inside!  Growing Wheat grass is VERY simple and so fun to watch progress because it happens so quickly!
AND... Not only does it look pretty inside, it also has some GREAT HEALTH BENEFITS!!! Here's an article I enjoyed on the Health Benefits of Wheat Grass, since you are growing it yourself- you know where it came from and how it was grown, does it get any more ORGANIC than that?!

Buy

Step one to growing your own Wheat Grass is to go to a store with a bulk food section (we love Fred Meyer for this reason).  You should be able to find Wheat Berries.  There are several different varieties- I usually end up getting Red.  This is what they look like.

Soak

Step 2 is just as simple.  Put them in a bowl and soak them in some water for 1-2 days.  After they are soaked, they will start to sprout- like the image below.  Once they've sprouted you are only a couple days away from beautiful grass!


Plant


You can use virtually any container to grow your wheat grass.  I personally think it is fascinating to also see the roots grow so I like planting them in glass.  But, I also like the look of the barnwood box I used, and metal!  (If you are using wood, make sure you line it with plastic so water doesn't seep out and ruin the surface you put it on.)  Use potting soil to fill your container about 1/2 an inch from the top.  Then sprinkle your sprouted wheat grass on top of the soil.  You want them to be really close together, but they don't need to be layered on top of each other.  


Water


The most important part of growing wheat grass is watering.  When you first lay them on top of your soil, make sure you saturate the soil pretty well with water.  Then, twice a day use a spray bottle on a mist setting and mist the wheat grass.  That is ALL YOU HAVE TO DO!

WATCH IT GROW


Using Wheat Grass in your Decor


I used a variety of containers to grow and incorporated them in my Kitchen, Dining Room and Living Room Mantel to brighten up my rooms for Spring!  There are many cute ideas on Pinterest, I am sure for how to use it in other seasons as well- Have fun Pinning!  How cute would a creative container planted with Wheat Grass be for a Mother's Day Gift?!


FOR KIDS TOO!

I also brought a container I planted to my Charges (the littles that I Nanny).  They LOVED watching the grass sprout, grow roots and grow each day and also enjoyed watering!  I encourage you to do this project with your children- and maybe even put some Wheat Grass in their next smoothie!


Linked Up At:


Blogging tips