Hello Friends-
I wanted to post a little note to let you all know that the bunch will be off the grid until July 7th. You won't hear from us until then- but our Summer Fun Giveaway will end on the 1st and a winner will be notified promptly on the 7th! Good luck and have a great week! Can't wait to share our cabin experiences with you when we get back!
Love,
Tracie, Kyle and Madisyn (oh, and Buddy too)

Saturday, June 29, 2013
Tuesday, June 25, 2013
Summer Fun GIVEAWAY Hop

I’m excited to announce that I’ll be participating in the Summer FUN Giveaway HOP! I was invited by the lovely Miss Kendra from A Proverbs 31 Wife. Thank you for the invitation Miss Kendra!
What’s this giveaway all about?
Well, all the bloggers taking part in this unique blog hop opportunity will be giving away their favorite Summer must-haves! That means you have a chance to win a lot of awesome Summer goodies.
{Some text and images borrowed from: The Fair Fox}
Madisyn and I have already been spending most of our days barefoot- and with the dry air our skin is starting to feel a little rough. If you are at all like us, you'll need to care for your skin on a daily basis this summer to keep it soft and healthy.
That’s why I’m giving away a Skin Pamper Package from the bunch. It'll include my choice of fragrance (Black Berry Lemondrop, Mango Lime, White Ginger, Coconut, Lavender or Mocha) in the following fabulous products:
Soap Bars by the bunch

Bath Bubbles

Body & Room Mist

Face & Body Cream

Used together, all of these fabulous products will keep your skin feeling smooth and hydrated.
To enter simply use the RaffleCopter Widget Below and check out the Linky to see all the other great Giveaways!
Thursday, June 20, 2013
Buy This Blog---
Hello Friends-
The excitement from our first sponsored blog post is finally subsiding- a little. I'm still indulging in periodic checks of google analytics to see how many of you are reading and from where- it is so interesting to me!
With all the potential for exposure with these opportunities, I've been thinking a lot about my blog design, and came across an awesome opportunity I wanted to share with you.
This could be a great way for the bunch to have a professionally designed blog, with minimal cost! Thought I would share with you, and wish me luck to win!
p.s. Stay tuned for a GIVEAWAY THIS AFTERNOON!!!!
Tuesday, June 18, 2013
Photo Storage Cabinet and Print Display
{Photo Storage Cabinet and Print Display} has been made possible by Shutterfly and Looksi Square.

This project was, by far, the most rewarding project I've ever completed. I was challenged by Shutterfly and Looksi Square by this:


This project was, by far, the most rewarding project I've ever completed. I was challenged by Shutterfly and Looksi Square by this:

And well, to be completely honest, I have been seriously lacking in physical prints lately. It is sad when I think about it, how the once suspense of picking up a set of prints is completely non-existent anymore.
I can remember how exciting it was, before digital cameras, to pick up the prints that were created from a roll of film you dropped off two weeks earlier. And now, I almost never even print photos anymore, even with how convenient it is.
So, with this challenge it gave me an opportunity to have some of the THOUSANDS of photos I have of Madisyn's first year and a half of life printed. The prints I received from Shutterfly were high quality and came SOOO FAST! I ordered them online and they were at my door step so quickly!
For my answer to the challenge, I wanted to create a cabinet {using as many re-purposed materials as possible} to house all things "photo". I LOVE photos and scrap-booking and creative photo displays and albums and collage books (the ones you can create so easily at Shutterfly) and I have A LOT of "photo stuff". When my project was complete, I was able to condense the items I had on 3 book shelves onto two and move one of them out of our living room all together because this cabinet neatly, and beautifully holds IT ALL!
It also doubles as a display piece. I'll show you how below!
The Process
Materials:
- 1 -Vintage 8 pane window (I originally intended to use two {as you can see from my Introduction Post } but it would have been a MASSIVE piece of furniture- and that was not the intent)
- 1 -1"x12"x12" board
- Spare 2x4 wood scraps
- 2 - Hinges
- Killz Primer
- Paint
- Wood Stain
- 8- Magnetic Paper Clips
- E6000 Glue
I outlined the planning process in my Update Blog Post-but I will do a quick review for you here as well.
Serena and I started by measuring the vintage window-{ the cabinet had to fit around it} and we simply used a tape measure to figure out the height I knew I wanted the top of the cabinet to be. We modeled our plans off of Ana White's Ikea Hemnes Linen Cabinet- I liked the basic farm style and knew I wanted the finish to highlight this design.
We quickly figured that we could make ALMOST the whole cabinet from the one 1x12x12 I wanted to use- and that was SOOO exciting to me! We worked together using the scary table saw, to rip down the 1x12 into 2x2's for the frame.


We used the 2x2's to construct a frame using the Kreg Jig to create pocket holes for wood screws and Gorilla Glue, of course.

Once the frame was complete I was able to set the vintage window inside to make sure it would fit- calculating the space needed around the window including space for the hinges was super nerve racking for Serena and I. Its so scary to create a frame for a door {and have it Gorilla Tough} and just HOPE you allowed enough space for the door to open. Needless to say {even with the vintage-completely un-square nature of the window} it seemed to fit!

Having already decided on a finish style (two toned wood stain and paint- as inspired by The Golden Syacmore), we were able to start cutting the boards needed to fill in all the empty space.
We measured the space between the sides of the frame that we would fill with the rest of the 1x12 ripped into boards about 3/4" thick and the width of a 2x4. I wanted to get a similar look with these boards as we achieved with Madisyn's Farm-Style Toddler Table.

After cutting the boards for the sides, we finally ran out of wood from the 1x12x12. So I went "shopping" in our reclaimed wood stash and pulled out some 2x4's that were long enough to rip down to make the top and shelves.
With all the measuring and wood cutting complete, it was time to start finishing! I gave the frame a good coat of primer with Kilz. And then two coats of a beautiful Blue.

I also took all of the wood to be stained {side panels, shelves and top} out onto the grass with a tarp underneath and stained both sides of each board.

With all the wood finished, it was time to assemble! We used finish nails to attach the top, sides and shelves to their support pieces. And I was nervous AGAIN. This would be the first opportunity to see if the door would actually function.
Kyle and I struggled with the best way to attach the hinges. I originally wanted the hinges to be internal (mounted on the inside of the frame and inside of the door- so all you might see from the exterior would be the round spine of the hinge). It was quickly clear that we had not allowed enough room for this style of mounting. So, we improvised (as the two of us are GREAT at doing) and mounted the hinges on the outside of the door and inside of the frame. This gave us an extra 1/8" ish for the door to swing. I ended up liking the look of the exposed hinges. What do you think?

Even with the hinges mounted on the exterior of the door, I still had to do some adjusting due to the vintage nature of the window. IT IS NOT SQUARE IN ANY WAY. It actually was wider in the middle than on the two ends, so in order to get it to close well, I had to do some sanding. Well, maybe a lot of sanding (but only in the middle of the window). Since I was already sanding, I decided to rough up some of the edges a bit and release any paint that was chipping and loose. I loved the way it weathered with a little sanding.
I also forgot to mention, that the window needed A LOT of cleaning. I use these windows for various projects and the best system I've come up with to clean them is to put them in the bath tub. Spray with the shower. Douse in Dawn. And use a stiff wire or plastic bristle scrub brush. It does a great job. This particular window had a TON of white over-spray on one side of the glass- so I also spent about half an hour with a razor blade getting as much of that off as possible.
Anyway, now that you've seen it finished, you are most likely wondering how I achieved the Display Frame Concept. I took the magnet part off of these handy-dandy clips using a screw driver.

Then, I glued the clip to the inside of the window/door in the center of each window pane using E6000 {by far my favorite glue for purposes such as this- see how I used it to create my beautiful Apothecary style Candlestick Vases here}


With the clips attached to the door front, it allows the openness I wanted to be able to view the pretty contents inside the cabinet, and the versatility of being able to switch out the prints whenever I want!
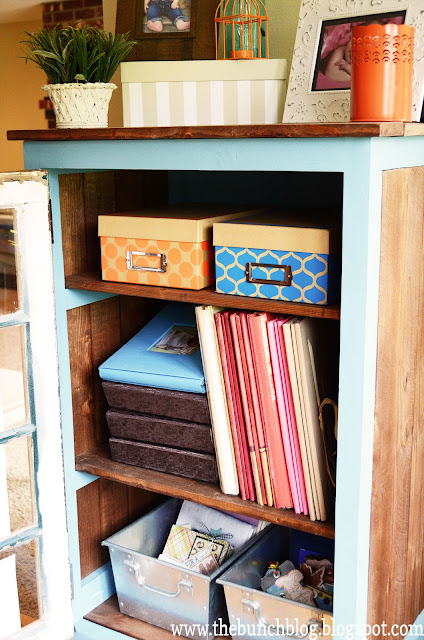
Inside the cabinet, I made the bottom shelf a good height for two metal bins I had to contain mini-albums.
The next shelf up fits 12x12 scrapbooks perfectly. And the top shelf houses two pretty photo boxes to keep my prints {that I will be printing frequently from now on} safe until I scrap-book them or put them in albums.

Serena and I had fun arranging a vignette on the top of the piece as well.

Thank you Serena and Kyle for all your help- it was a lot of fun! And thank you to Shutterfly and Looksi Square for the opportunity to have my first sponsored blog post!

I LOVE IT and can't wait to show it off in my home!

Looksi and Shutterfly have invited me to participate in a creative brand collaboration. I have been provided with product compensation for this post, but all opinions are my own.
Some of my blog world friends also participated in this challenge and came up with some amazing ideas. Please take a look at their challenge posts!
Linked up at:
Bubbly Nature Creations- The Make Bake Create Party
Thursday, June 13, 2013
Part 3- Rag Tie Wreath- 3 Quick Patriotic Handcrafts
My front door has been un-decorated for quite some time now... its been begging for a summer wreath. The door was screaming "Give me some Red, White, and Blue!".
With SOOOOO many adorable patriotic wreath ideas on Pinterest it was hard to choose which direction to go with my wreath. However, I've been having a lot of fun with "rag tie" projects lately, such as my Rag-Tie Bunting Banner and other custom orders I've had in my Etsy Shop lately, I decided it would be fun to try a rag tie wreath- in similar fashion as a tutu wreath.


With SOOOOO many adorable patriotic wreath ideas on Pinterest it was hard to choose which direction to go with my wreath. However, I've been having a lot of fun with "rag tie" projects lately, such as my Rag-Tie Bunting Banner and other custom orders I've had in my Etsy Shop lately, I decided it would be fun to try a rag tie wreath- in similar fashion as a tutu wreath.

My mom was over visiting from her Lavender Farm in Sequim, WA- so we got to make these together- and she had one to take home too.
We started off by cutting strips of fabric (2 inches wide and about 9 inches long.)

We cut Red, Blue and Burlap. Then we cut the middle of the shrink plastic out of our straw wreaths my mom had for likely 20+ years and never did anything with.


Then we simply just started tying knots!

Mine had about 5 red strips in each red section, 2 burlap strips and a big section of blue.


And this is what it looked like after it was fully tied. It needed something more- so I added some left over stars from my Starry Banner Handcraft. And it turned out GREAT!


This concludes my 3 part blog series of 3 Quick Patriotic Handcrafts. If you missed part 1 or 2 you can find them here:
I hope you'll take a few minutes and add some Patriotic Flare to your home for the coming holidays.
Did you blog about a quick handcraft I can link up here? Please leave me a comment!
Tuesday, June 11, 2013
Part 2- God Bless America Sign- 3 Quick Patriotic Handcrafts
My mantel decor is almost never complete with out a sign of some kind...and this time I didn't have one already made that would suffice.

The hubby and I were in the garage working on my Shutterfly and Looksi Creative Brand Collaboration Challenge and I spotted a VERY OLD piece of scrap wood that would make a beautiful sign. I picked the piece off of a garage built in the early 1900's in downtown Renton- it was a piece of molding around a window. The gracious owners also let me purchase the doors off the garage- they were original barn style garage doors- beautiful- and still in my garage awaiting the perfect home (against the will of my LOVING husband).

I cut the beautiful board into 3 equal lengths and used a scrap 1x2 to secure them together. We hadn't yet replaced our finish-nailer that was stolen during our break-in so I had to use screws, a bit overkill- but oh well!

Because this wood is SOOOO old, I took extra precautions when sanding its rough edges after I cut the boards. I was worried about the paint- so I wore a mask while sanding. I sanded more than I typically would, because I used another one of these boards for one of my You Light Up My Life Lamps and I struggled to get the vinyl to stick on that project. I was hoping some extra sanding would take care of this issue.

With it all sanded up, and secure together I took it inside and applied some vinyl!

I left the bottom pannel empty because I wanted to do some embellishing. I splurged, with a gift certificate my lovely sister gave me for my birthday last year, on some burlap ribbon. This is the look I wanted since I knew I would be using burlap in my wreath (part 3 of my patriotic tutorials) and its always nice to tie things together.
So, I tied a simple knot with some burlap- decided it needed some color and added in some bright blue rick rack.
Finished it off by hot gluing some small white stars left over from my Starry Banner and a simple button heart.
And THAT'S ALL! Simple, quick and easy!


Our final and part 3 to our series will be a Patriotic Wreath- I hope to get it posted tomorrow- but we have a new baby to welcome to our family! I am determined to go see Madisyn's new baby cousin, Arabella, at the hospital tomorrow night- so you might see our Patriotic Wreath post on Thursday! Can't wait to share.
Linked Up At:
Sunday, June 9, 2013
3 Quick Patriotic Handcrafts- part1- Starry Banner
For my summer Mantel I wanted to create a Patriotic theme that could last from Memorial day to Labor day with the highlight of Independence Day, of course.

I used my Silhouette to cut out 3 different sized star shapes in 3 different colors. White was 1.5", Blue was 2" and Red was 3". I sewed them on to wax paper leaving space between each star.

After they were sewn, I carefully peeled off the wax paper revealing just the thread and the stars! I had enough stars to create two 4' garlands and I LOVE them both on my mantel! I even had enough little white stars left to add them into my two other Patriotic Handcrafts to tie everything together!

I can't wait to share another tomorrow... stay tuned!


Part 1- Starry Banner
I knew I wanted a banner or garland of some sort- and had pinned a few different ideas. After creating the Jelly Bean Banners, I decided a quick and easy way to bring some RED, WHITE, and BLUE would be to use the same technique, but with star shapes.I used my Silhouette to cut out 3 different sized star shapes in 3 different colors. White was 1.5", Blue was 2" and Red was 3". I sewed them on to wax paper leaving space between each star.

After they were sewn, I carefully peeled off the wax paper revealing just the thread and the stars! I had enough stars to create two 4' garlands and I LOVE them both on my mantel! I even had enough little white stars left to add them into my two other Patriotic Handcrafts to tie everything together!

I can't wait to share another tomorrow... stay tuned!
Monday, June 3, 2013
Summer iPhone Wall Papers!
I LOVED my spring iPhone wall papers I created so much, and I'm feeling VERY summery these days, so I figured it was time to update my backgrounds!
Here is a FREE lock screen and home screen for your iPhone!
CLICK IMAGES TO BE DIRECTED TO IMAGE TO SAVE- DIRECTIONS BELOW (if you need them)


Here is a FREE lock screen and home screen for your iPhone!
CLICK IMAGES TO BE DIRECTED TO IMAGE TO SAVE- DIRECTIONS BELOW (if you need them)
"Summer" For your LOCK SCREEN
"Summer2" For your HOME SCREEN
Here's How:
- Just click the image and you will be redirected to where you can save it from on my website.
- If you do it right from your phone, hold your finger down over the image until the menu comes up and click "Save Image".
- Then go to your Photos on your home screen and find the image you just saved.
- Click on it to open it to full screen size.
- Click the arrow in the bottom left corner.
- Then click "Use as Wallpaper" in the bottom right corner.
- No need to crop or move, just press "Set".
- Then use the first one with the large frame in the middle as your Lock Screen. Save "Summer" as your Lock Screen.
- Save "Summer2" for your Home Screen using the same steps above- and
ENJOY!!!
LOVE the background image?! I found it and SOOO many others that were hard to resist at Doodle Craft! Please comment on this post if you use any of them for something creative- I'd LOVE to see!
Here's so Summer Days!
Subscribe to:
Posts (Atom)